TypeOrm
Demo项目配置
首先初始化一个 typeORM 的 demo 项目
npx typeorm@latest init --name temp_typeorm-all-feature --database mysql
确认好数据源配置信息启动
src/data-source.ts
import "reflect-metadata"
import { DataSource } from "typeorm"
import { User } from "./entity/User"

export const AppDataSource = new DataSource({
    type: "mysql",
    host: "localhost",
    port: 3306,
    username: "root",
    password: "123",
    database: "test",
    synchronize: true,
    logging: false,
    entities: [User],
    migrations: [],
    subscribers: [],
})
如果此时有报错 Client does not support authentication protocol requested by server; consider upgrading MySQL client
Error: ER_NOT_SUPPORTED_AUTH_MODE: Client does not support authentication protocol requested by server; consider upgrading MySQL client
    at Handshake.Sequence._packetToError (/Users/xiaohao/FE/temp_typeorm-all-feature/node_modules/mysql/lib/protocol/sequences/Sequence.js:47:14)
    at Handshake.ErrorPacket (/Users/xiaohao/FE/temp_typeorm-all-feature/node_modules/mysql/lib/protocol/sequences/Handshake.js:123:18)
    at Protocol._parsePacket (/Users/xiaohao/FE/temp_typeorm-all-feature/node_modules/mysql/lib/protocol/Protocol.js:291:23)
    at Parser._parsePacket (/Users/xiaohao/FE/temp_typeorm-all-feature/node_modules/mysql/lib/protocol/Parser.js:433:10)
    at Parser.write (/Users/xiaohao/FE/temp_typeorm-all-feature/node_modules/mysql/lib/protocol/Parser.js:43:10)
    at Protocol.write (/Users/xiaohao/FE/temp_typeorm-all-feature/node_modules/mysql/lib/protocol/Protocol.js:38:16)
    at Socket.<anonymous> (/Users/xiaohao/FE/temp_typeorm-all-feature/node_modules/mysql/lib/Connection.js:88:28)
    at Socket.<anonymous> (/Users/xiaohao/FE/temp_typeorm-all-feature/node_modules/mysql/lib/Connection.js:526:10)
    at Socket.emit (node:events:517:28)
    at Socket.emit (node:domain:489:12)
    --------------------
    at Protocol._enqueue (/Users/xiaohao/FE/temp_typeorm-all-feature/node_modules/mysql/lib/protocol/Protocol.js:144:48)
    at Protocol.handshake (/Users/xiaohao/FE/temp_typeorm-all-feature/node_modules/mysql/lib/protocol/Protocol.js:51:23)
    at PoolConnection.connect (/Users/xiaohao/FE/temp_typeorm-all-feature/node_modules/mysql/lib/Connection.js:116:18)
    at Pool.getConnection (/Users/xiaohao/FE/temp_typeorm-all-feature/node_modules/mysql/lib/Pool.js:48:16)
    at /Users/xiaohao/FE/temp_typeorm-all-feature/node_modules/typeorm/src/driver/mysql/MysqlDriver.ts:1268:18
    at new Promise (<anonymous>)
    at MysqlDriver.createPool (/Users/xiaohao/FE/temp_typeorm-all-feature/node_modules/typeorm/src/driver/mysql/MysqlDriver.ts:1265:16)
    at MysqlDriver.connect (/Users/xiaohao/FE/temp_typeorm-all-feature/node_modules/typeorm/src/driver/mysql/MysqlDriver.ts:400:36)
    at DataSource.initialize (/Users/xiaohao/FE/temp_typeorm-all-feature/node_modules/src/data-source/DataSource.ts:253:27)
    at Object.<anonymous> (/Users/xiaohao/FE/temp_typeorm-all-feature/src/index.ts:4:15) {
  code: 'ER_NOT_SUPPORTED_AUTH_MODE',
  errno: 1251,
  sqlMessage: 'Client does not support authentication protocol requested by server; consider upgrading MySQL client',
  sqlState: '08004',
  fatal: true
}
因为默认 MySQL client 版本较低,可以使用 MySQL2
npm i mysql2
指定 connectorPackage 为 mysql2
import "reflect-metadata"
import { DataSource } from "typeorm"
import { User } from "./entity/User"

export const AppDataSource = new DataSource({
    type: "mysql",
    host: "localhost",
    port: 3306,
    username: "root",
    password: "123",
    database: "test",
    synchronize: true,
    connectorPackage: 'mysql2',
    logging: false,
    entities: [User],
    migrations: [],
    subscribers: [],
})
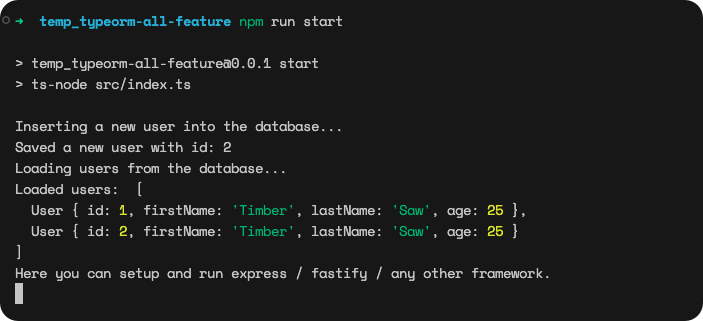
启动测试,默认有一个 User 实体 entity !

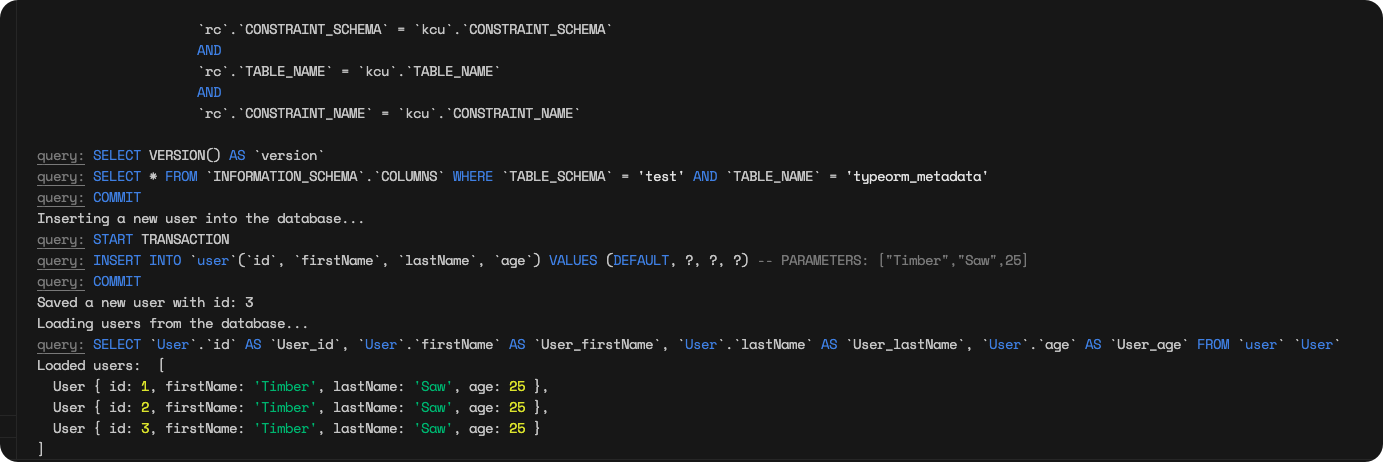
启动自动帮我们创建了 user 表,因为我自己启动了两次 所以自己插入了两次数据,它启动脚本的逻辑
import { AppDataSource } from "./data-source"
import { User } from "./entity/User"

AppDataSource.initialize().then(async () => {

    console.log("Inserting a new user into the database...")
    const user = new User()
    user.firstName = "Timber"
    user.lastName = "Saw"
    user.age = 25
    await AppDataSource.manager.save(user)
    console.log("Saved a new user with id: " + user.id)

    console.log("Loading users from the database...")
    const users = await AppDataSource.manager.find(User)
    console.log("Loaded users: ", users)

    console.log("Here you can setup and run express / fastify / any other framework.")

}).catch(error => console.log(error))
配置说明
import "reflect-metadata"
import { DataSource } from "typeorm"
import { User } from "./entity/User"

export const AppDataSource = new DataSource({
    type: "mysql",
    host: "localhost",
    port: 3306,
    username: "root",
    password: "123",
    database: "test",
    synchronize: true,
    connectorPackage: 'mysql2',
    logging: true,
    entities: [User],
    migrations: [],
    subscribers: [],
})
type 是数据库的类型,因为 TypeORM 不只支持 MySQL 还支持 postgres、oracle、sqllite 等数据库。
host、port 是指定数据库服务器的主机和端口号。
user、password 是登录数据库的用户名和密码。
database 是要指定操作的 database,因为 mysql 是可以有多个 database 或者叫 schema 的。
synchronize 是根据同步建表,也就是当 database 里没有和 Entity 对应的表的时候,会自动生成建表 sql 语句并执行。
logging 是打印生成的 sql 语句。
 entities 是指定有哪些和数据库的表对应的 Entity。[如果指定了synchronize 为 true,就自动创建这里指定实体的数据库]
import {Column, Entity, PrimaryColumn, PrimaryGeneratedColumn} from "typeorm";

@Entity()
export default class Goods {
    @PrimaryGeneratedColumn()
    Id: number;

    @Column()
    GoodsName: string;

    @Column()
    GoodsPrice: number;
}


这里把 id 换成了 PrimaryGeneratedColumn
PRIMARY KEY AUTO_INCREMENT
migrations 是修改表结构之类的 sql
subscribers 是一些 Entity 生命周期的订阅者,比如 insert、update、remove 前后,可以加入一些逻辑
poolSize 是指定数据库连接池中连接的最大数量。
connectorPackage 是指定用什么驱动包。
extra 是额外发送给驱动包的一些选项。
这些配置都保存在 DataSource 里。
CRUD
单个增加
import {AppDataSource} from "./data-source"
import {User} from "./entity/User"
import Goods from "./entity/Goods";

AppDataSource.initialize().then(async () => {
    const newGood = new Goods()
    newGood.GoodsName = "雪花肥牛"
    newGood.GoodsPrice = 88
    const res = await AppDataSource.manager.save(newGood)
    console.log(res)
}).catch(error => console.log(error))

如果指定了 id,那就变成修改了
import {AppDataSource} from "./data-source"
import {User} from "./entity/User"
import Goods from "./entity/Goods";

AppDataSource.initialize().then(async () => {
    const newGood = new Goods()
    newGood.GoodsName = "雪花肥牛(修改)"
    newGood.GoodsPrice = 88
    newGood.Id = 1
    const res = await AppDataSource.manager.save(newGood)
    console.log(res)
}).catch(error => console.log(error))

当你指定了 id 的时候,typeorm 会先查询这个 id 的记录,如果查到了,那就执行 update。

如果查不到那就是插入
import {AppDataSource} from "./data-source"
import {User} from "./entity/User"
import Goods from "./entity/Goods";

AppDataSource.initialize().then(async () => {
    const newGood = new Goods()
    newGood.GoodsName = "雪花肥牛(修改)"
    newGood.GoodsPrice = 88
    newGood.Id = 901
    const res = await AppDataSource.manager.save(newGood)
    console.log(res)
}).catch(error => console.log(error))

数据库中就多一条 Id 为 901 的商品
| GoodsName | GoodsPrice | Id |
|---|---|---|
| 雪花肥牛(修改) | 88 | 1 |
| 雪花肥牛(修改) | 88 | 901 |
批量插入
import {AppDataSource} from "./data-source"
import {User} from "./entity/User"
import Goods from "./entity/Goods";

AppDataSource.initialize().then(async () => {
    await AppDataSource.manager.save(Goods, [
        {
            GoodsName: "吊龙",
            GoodsPrice: 78,
        },
        {
            GoodsName: "嫩肉",
            GoodsPrice: 88,
        },
        {
            GoodsName: "三花趾",
            GoodsPrice: 90,
        }
    ])
}).catch(error => console.log(error))

| GoodsName | GoodsPrice | Id |
|---|---|---|
| 雪花肥牛(修改) | 88 | 1 |
| 雪花肥牛(修改) | 88 | 901 |
| 吊龙 | 78 | 902 |
| 嫩肉 | 88 | 903 |
| 三花趾 | 90 | 904 |
批量修改-传入 Id 就行了
import {AppDataSource} from "./data-source"
import {User} from "./entity/User"
import Goods from "./entity/Goods";

AppDataSource.initialize().then(async () => {
    await AppDataSource.manager.save(Goods, [
        {
            GoodsName: "无敌吊龙",
            GoodsPrice: 78,
            Id: 902,
        },
        {
            GoodsName: "超绝嫩肉",
            GoodsPrice: 88,
            Id: 903,
        },
        {
            GoodsName: "夺命三花趾",
            GoodsPrice: 90,
            Id: 904,
        }
    ])
}).catch(error => console.log(error))
同样的套路 先查 查得到就 update

EntityManager 还有 update 和 insert 方法,分别是修改和插入的,但是它们不会先 select 查询一次。
而 save 方法会先查询一次数据库来确定是插入还是修改。
如果同样的在执行一次 Insert
import {AppDataSource} from "./data-source"
import {User} from "./entity/User"
import Goods from "./entity/Goods";

AppDataSource.initialize().then(async () => {
    await AppDataSource.manager.insert(Goods, [
        {
            GoodsName: "无敌吊龙",
            GoodsPrice: 78,
            Id: 902,
        },
        {
            GoodsName: "超绝嫩肉",
            GoodsPrice: 88,
            Id: 903,
        },
        {
            GoodsName: "夺命三花趾",
            GoodsPrice: 90,
            Id: 908,
        }
    ])
}).catch(error => console.log(error))
就会直接报错 重复key,因为他不管其他的直接插,有异常就直接暴露异常!

删除和批量删除用 delete 方法
import {AppDataSource} from "./data-source"
import {User} from "./entity/User"
import Goods from "./entity/Goods";

AppDataSource.initialize().then(async () => {
    // 单个ID删除
    await AppDataSource.manager.delete(Goods, 1)

    // 多个ID删除
    await AppDataSource.manager.delete(Goods, [903,904])
}).catch(error => console.log(error))

| GoodsName | GoodsPrice | Id |
|---|---|---|
| 雪花肥牛(修改) | 88 | 901 |
| 无敌吊龙 | 78 | 902 |
| 夺命三花趾 | 90 | 908 |
删除和批量删除用 remove 方法
delete 和 remove 的区别是,delete 直接传 id、而 remove 则是传入 entity 对象。
import {AppDataSource} from "./data-source"
import {User} from "./entity/User"
import Goods from "./entity/Goods";

AppDataSource.initialize().then(async () => {
    // 外部传入一个 Id 查出来 然后删除
    const goods = await AppDataSource.manager.findOneBy(Goods, {
        Id: 901
    })
    await AppDataSource.manager.remove(Goods, goods)
}).catch(error => console.log(error))

查询是使用 find 方法
find 方法很多变式

import {AppDataSource} from "./data-source"
import {User} from "./entity/User"
import Goods from "./entity/Goods";

AppDataSource.initialize().then(async () => {
    // 外部传入一个 Id 查出来 然后删除
    const goods = await AppDataSource.manager.find(Goods)
    console.log(goods)
}).catch(error => console.log(error))

指定更多条件
import {AppDataSource} from "./data-source"
import {User} from "./entity/User"
import Goods from "./entity/Goods";

AppDataSource.initialize().then(async () => {
    const goods = await AppDataSource.manager.find(Goods, {
        select: {
            GoodsName: true,
            GoodsPrice: true
        },
        order: {
            GoodsPrice: "desc"
        }
    })
    console.log(goods)
}).catch(error => console.log(error))

findBy 方法根据条件查询
import {AppDataSource} from "./data-source"
import {User} from "./entity/User"
import Goods from "./entity/Goods";

AppDataSource.initialize().then(async () => {
    const goods = await AppDataSource.manager.findBy(Goods,{
        GoodsName:"无敌吊龙"
    })
    console.log(goods)
}).catch(error => console.log(error))

findAndCount 来拿到有多少条记录
import {AppDataSource} from "./data-source"
import {User} from "./entity/User"
import Goods from "./entity/Goods";

AppDataSource.initialize().then(async () => {
    const goods = await AppDataSource.manager.findAndCountBy(Goods,{
        GoodsName:"无敌吊龙"
    })
    console.log(goods)
}).catch(error => console.log(error))

会额外执行一个统计的 sql
除了可以查询多条,还可以查询一条,使用 findOne
import {AppDataSource} from "./data-source"
import {User} from "./entity/User"
import Goods from "./entity/Goods";

AppDataSource.initialize().then(async () => {
    const goods = await AppDataSource.manager.findOne(Goods, {
        select: {
            GoodsName: true,
            GoodsPrice: true
        },
        where:{
            GoodsName:"无敌吊龙"
        },
        order: {
            GoodsPrice: "desc"
        }
    })
    console.log(goods)
}).catch(error => console.log(error))

会抛出异常的查询 findOneOrFail
import {AppDataSource} from "./data-source"
import {User} from "./entity/User"
import Goods from "./entity/Goods";
import {In} from "typeorm";

AppDataSource.initialize().then(async () => {
    const goods = await AppDataSource.manager.findOneOrFail(Goods, {
        select: {
            GoodsName: true,
            GoodsPrice: true
        },
        where: {
            Id: In([666, 999])
        },
        order: {
            GoodsPrice: "desc"
        }
    })
    console.log(goods)
}).catch(error => console.log(error))

会抛出 EntityNotFoundError: 异常!
query 方法直接执行 sql 语句
import {AppDataSource} from "./data-source"
import {User} from "./entity/User"
import Goods from "./entity/Goods";

AppDataSource.initialize().then(async () => {
    const res = await AppDataSource.manager.query("select GoodsName,GoodsPrice from goods order by GoodsPrice DESC")
    console.log(res)
}).catch(error => console.log(error))

query builder
复杂 sql 语句不会直接写,而是会用 query builder,涉及到多个表,也就是多个 Entity 的关联查询
import {AppDataSource} from "./data-source"
import {User} from "./entity/User"
import Goods from "./entity/Goods";

AppDataSource.initialize().then(async () => {
    const queryBuilder = AppDataSource.manager.createQueryBuilder();

    const res = await queryBuilder
        .select("g.GoodsName").from(Goods, 'g')
        .where('g.GoodsName like:GoodsName')
        .andWhere('g.GoodsPrice >:GoodsPrice')
        .setParameters({
            GoodsName: "%龙",
            GoodsPrice: 50,
        }).execute()
    console.log(res)
}).catch(error => console.log(error))

等价于下面这个 SQL
SELECT GoodsName FROM goods as g where g.GoodsName like "%龙" and g.GoodsPrice > 50;

使用事务
创建一个余额Balances表和产品表
Balances
import {Column, Entity, PrimaryGeneratedColumn} from "typeorm";

@Entity({
    name: "balances"
})
export default class Balances {
    // 主键自增列,一般命名为类似表名加_id的形式,这里表示余额记录的唯一标识
    @PrimaryGeneratedColumn()
    balance_id: number;

    // 关联到客户的ID,命名体现其关联性和用途
    @Column()
    customer_id: number;

    // 可用余额字段,清晰表明含义且遵循命名规范
    @Column({
        type: "decimal",
        precision: 10,
        scale: 2
    })
    available_balance: number;

    @Column({
        type: "timestamp",
        onUpdate: 'CURRENT_TIMESTAMP',
        default: () => 'CURRENT_TIMESTAMP',
    })
    last_updated: number;
}
Product
import { Entity, Column, PrimaryGeneratedColumn } from 'typeorm';

@Entity('products')
export class Product {
    @PrimaryGeneratedColumn()
    product_id: number;

    @Column({ type: 'varchar', length: 255, nullable: false })
    product_name: string;

    @Column({ type: 'decimal', precision: 10, scale: 2, nullable: false })
    price: number;

    @Column({ type: 'int', nullable: false })
    stock_quantity: number;
}

-- 余额表
CREATE TABLE `balances`
(
    `balance_id`        int            NOT NULL AUTO_INCREMENT,
    `customer_id`       int            NOT NULL,
    `available_balance` decimal(10, 2) NOT NULL,
    `last_updated`      timestamp      NOT NULL DEFAULT CURRENT_TIMESTAMP ON UPDATE CURRENT_TIMESTAMP,
    PRIMARY KEY (`balance_id`)
) ENGINE = InnoDB


-- 产品表
CREATE TABLE `products`
(
    `product_id`     int            NOT NULL AUTO_INCREMENT,
    `product_name`   varchar(255)   NOT NULL,
    `price`          decimal(10, 2) NOT NULL,
    `stock_quantity` int            NOT NULL,
    PRIMARY KEY (`product_id`)
) ENGINE = InnoDB
然后插入点数据
-- 余额
INSERT INTO balances (customer_id, available_balance)
VALUES
    (1001, 15000.00),
    (1002, 8000.00),
    (1003, 10000.00),
    (1004, 12000.00),
    (1005, 5000.00),
    (1006, 9000.00);

-- 产品
 INSERT INTO products (product_name, price, stock_quantity)
VALUES
    -- 手机类商品
    ('iPhone 15 Pro', 8999.00, 50),
    ('华为 P60 Pro', 6488.00, 40),
    ('小米 14', 4299.00, 60),
    ('三星 Galaxy S24', 7499.00, 35),
    -- 电脑类商品
    ('联想小新 Pro 16', 6999.00, 20),
    ('戴尔灵越 16 Plus', 7999.00, 15),
    ('苹果 MacBook Air M2', 9999.00, 10),
    ('华为 MateBook X Pro', 8999.00, 8),
    -- 家电类商品
    ('美的空调 KFR-35GW', 2999.00, 30),
    ('海尔冰箱 BCD-596WGH', 4999.00, 18),
    ('格力电风扇 FS-3015h7', 399.00, 50),
    ('苏泊尔电饭煲 CFXB40FC833 - 75', 299.00, 45);
import {AppDataSource} from "./data-source"
import {User} from "./entity/User"
import {Product} from "./entity/Product";
import Balances from "./entity/Balances";

AppDataSource.initialize().then(async () => {
    await AppDataSource.manager.transaction(async manger => {
        const p = manger.getRepository(Product)
        const b = manger.getRepository(Balances)

        const product = await p.findOneBy({
            product_name: "iPhone 15 Pro"
        })
        if (product.stock_quantity <= 0) return
        const balance = await b.findOneBy({
            balance_id: 1
        })
        if (Number(balance.available_balance) < Number(product.price)) return
        product.stock_quantity -= 1
        await p.save(product)
        balance.available_balance -= Number(product.price)
        await b.save(balance)
    })
}).catch(error => console.log(error))
开启事务用 transaction 方法包裹下就好了。
上面的逻辑 先查商品库存,然后查余额是否能买,然后扣库存,扣余额,没有报错自动提交事务

报错也会自动回滚
import {AppDataSource} from "./data-source"
import {User} from "./entity/User"
import {Product} from "./entity/Product";
import Balances from "./entity/Balances";

AppDataSource.initialize().then(async () => {
    await AppDataSource.manager.transaction(async manger => {
        const p = manger.getRepository(Product)
        const b = manger.getRepository(Balances)

        const product = await p.findOneBy({
            product_name: "iPhone 15 Pro"
        })
        if (product.stock_quantity <= 0) return
        const balance = await b.findOneBy({
            balance_id: 3
        })
        if (Number(balance.available_balance) < Number(product.price)) return
        product.stock_quantity -= 1
        await p.save(product)
        throw new Error("模拟事务中异常")
        balance.available_balance -= Number(product.price)
        await b.save(balance)
    })
}).catch(error => console.log(error))

可以看到数据表中库存也扣除失败

小结
DataSource 里管理着数据库连接配置,数据库驱动包,调用它的 intialize 方法会创建和 mysql 的连接。
连接创建的时候,如果指定了 synchronize,会根据 Entitiy 生成建表 sql。
Entity 里通过 @Entity 指定和数据库表的映射,通过 @PrimaryGeneratedColumn 和 @Column 指定和表的字段的映射。
对 Entity 做增删改查通过 EntityManager 的 save、delete、find、createQueryBuilder 等方法。
如果只是对单个 Entity 做 CRUD,那可以先 getRepository 拿到对具体 Entity 操作的工具类,再调用 save、delete、find 等方法。
具体的 EntityManager 和 Repository 的方法有这些:
- save:新增或者修改 Entity,如果传入了 id 会先 select 再决定修改还新增
- update:直接修改 Entity,不会先 select
- insert:直接插入 Entity
- delete:删除 Entity,通过 id
- remove:删除 Entity,通过对象
- find:查找多条记录,可以指定 where、order by 等条件
- findBy:查找多条记录,第二个参数直接指定 where 条件,更简便一点
- findAndCount:查找多条记录,并返回总数量
- findByAndCount:根据条件查找多条记录,并返回总数量
- findOne:查找单条记录,可以指定 where、order by 等条件
- findOneBy:查找单条记录,第二个参数直接指定 where 条件,更简便一点
- findOneOrFail:查找失败会抛 EntityNotFoundError 的异常
- query:直接执行 sql 语句
- createQueryBuilder:创建复杂 sql 语句,比如 join 多个 Entity 的查询
- transaction:包裹一层事务的 sql
- getRepository:拿到对单个 Entity 操作的类,方法同 EntityManager


评论区