


代码规范: 如何利用 Lint 工具链来保证代码风格和质量?
代码不仅是让机器看的,它也是给人看的。
在真实的工程项目中,尤其是多人协作的场景下,代码规范就变得非常重要了:
- 它可以用来统一团队代码风格,避免不同风格的代码混杂到一起难以阅读
- 有效提高代码质量
- 甚至可以将一些语法错误在开发阶段提前规避掉。
但仅有规范本身不够,我们需要自动化的工具(即Lint 工具)来保证规范的落地,把代码规范检查(包括自动修复)这件事情交给机器完成,开发者只需要专注应用逻辑本身。
本节,我们将一起来完成 Lint 工具链在项目中的落地,实现自动化代码规范检查及修复的能力。
去熟悉诸如ESLint、Prettier、Stylelint和Commitlint 等诸多主流 Lint 工具的概念和使用
还需要配合husky、lint-staged、VSCode 插件和Vite 生态在项目中集成完整的 Lint 工具链,搭建起完整的前端开发和代码提交工作流
这部分内容虽然和 Vite 没有直接的联系,但也是 Vite 项目搭建中非常重要的一环,是前端工程化的必备知识。
JS/TS 规范工具: ESLint
ESLint是在ECMAScript/JavaScript代码中识别和报告模式匹配的工具,它的目标是 保证代码的一致性 和 避免错误 。
Eslint 是国外的前端大牛Nicholas C. Zakas在 2013 年发起的一个开源项目,有一本书被誉为前端界的"圣经",叫《JavaScript 高级程序设计》(即红宝书),他正是这本书的作者。
Nicholas 当初做这个开源项目,就是为了打造一款插件化的 JavaScript 代码静态检查工具,通过解析代码的 AST 来分析代码格式,检查代码的风格和质量问题。现在,Eslint 已经成为一个非常成功的开源项目了,基本上属于前端项目中 Lint 工具的标配。
ESLint 的使用并不复杂,主要通过配置文件对各种代码格式的规则(
rules)进行配置,以指定具体的代码规范。
目前开源社区也有一些成熟的规范集可供使用,著名的包括Airbnb JavaScript 代码规范、Standard JavaScript 规范、Google JavaScript 规范等等
你可以在项目中直接使用这些成熟的规范,也可以自己定制一套团队独有的代码规范,这在一些大型团队当中还是很常见的。
初始化
接下来我们来利用 ESLint 官方的 cli 在现有的脚手架项目中进行初始化操作,首先我们需要安装 ESLint:参考官方
安装 ESLint:
pnpm install eslint --save-dev
紧接着你应该设置一个配置文件:(也可以在全局而不是本地安装 ESLint (使用 npm install eslint --global)。但是,你使用的任何插件或可共享配置都必须安装在本地。)
./node_modules/.bin/eslint yourfile.js
这个配置文件可以使用 ./node_modules/.bin/eslint --init 直接生成!执行这个命令会让你进行一些规则的选择配置操作!选择你需要的就行了!
下面是安装过程中完整的安装日志!
╭─ ~/CunWangOwn/FE/temp-vite ───────────── ✔ at 08:43:07 ─╮
╰─ pnpm install eslint --save-dev ─╯
╭──────────────────────────────────────────────────────────────────╮
│ │
│ Update available! 7.9.5 → 7.17.1. │
│ Changelog: https://github.com/pnpm/pnpm/releases/tag/v7.17.1 │
│ Run "pnpm add -g pnpm" to update. │
│ │
│ Follow @pnpmjs for updates: https://twitter.com/pnpmjs │
│ │
╰──────────────────────────────────────────────────────────────────╯
Packages: +84
++++++++++++++++++++++++++++++++++++++++++++++++++++++++++++++++++++++++
Progress: resolved 247, reused 211, downloaded 15, added 84, done
devDependencies:
+ eslint 8.28.0
╭─ ~/CunWangOwn/FE/temp-vite ───────────── ✔ at 09:00:38 ─╮
╰─ ./node_modules/.bin/eslint --init ─╯
You can also run this command directly using 'npm init @eslint/config'.
Need to install the following packages:
@eslint/create-config
Ok to proceed? (y) y
✔ How would you like to use ESLint? · style
✔ What type of modules does your project use? · esm
✔ Which framework does your project use? · react
✔ Does your project use TypeScript? · No / Yes
✔ Where does your code run? · browser
✔ How would you like to define a style for your project? · guide
✔ Which style guide do you want to follow? · standard-with-typescript
✔ What format do you want your config file to be in? · JavaScript
Checking peerDependencies of eslint-config-standard-with-typescript@latest
The config that you've selected requires the following dependencies:
eslint-plugin-react@latest eslint-config-standard-with-typescript@latest @typescript-eslint/eslint-plugin@^5.0.0 eslint@^8.0.1 eslint-plugin-import@^2.25.2 eslint-plugin-n@^15.0.0 eslint-plugin-promise@^6.0.0 typescript@*
✔ Would you like to install them now? · No / Yes
✔ Which package manager do you want to use? · pnpm
Installing eslint-plugin-react@latest, eslint-config-standard-with-typescript@latest, @typescript-eslint/eslint-plugin@^5.0.0, eslint@^8.0.1, eslint-plugin-import@^2.25.2, eslint-plugin-n@^15.0.0, eslint-plugin-promise@^6.0.0, typescript@*
Packages: +92
++++++++++++++++++++++++++++++++++++++++++++++++++++++++++++++++++++++++
Progress: resolved 339, reused 292, downloaded 26, added 92, done
devDependencies:
+ @typescript-eslint/eslint-plugin 5.45.0
+ eslint-config-standard-with-typescript 23.0.0
+ eslint-plugin-import 2.26.0
+ eslint-plugin-n 15.5.1
+ eslint-plugin-promise 6.1.1
+ eslint-plugin-react 7.31.11
WARN Issues with peer dependencies found
.
├─┬ @typescript-eslint/eslint-plugin 5.45.0
│ └── ✕ missing peer @typescript-eslint/parser@^5.0.0
└─┬ eslint-plugin-import 2.26.0
├── ✕ missing peer @typescript-eslint/parser@"*"
└─┬ eslint-module-utils 2.7.4
└── ✕ missing peer @typescript-eslint/parser@"*"
Peer dependencies that should be installed:
@typescript-eslint/parser@">=5.0.0 <6.0.0"
Successfully created .eslintrc.cjs file in /Users/codehope/CunWangOwn/FE/temp-vite
因为我们选择的是js作为配置文件,所以配置完成后,eslint帮我们生成了一个 .eslintrc.cjs 文件
// .eslintrc.cjs
module.exports = {
  env: {
    browser: true,
    es2021: true
  },
  extends: [
    'plugin:react/recommended',
    'standard-with-typescript'
  ],
  overrides: [
  ],
  parserOptions: {
    ecmaVersion: 'latest',
    sourceType: 'module'
  },
  plugins: [
    'react'
  ],
  rules: {
  }
}
.eslintrc.cjs核心配置解读
1. parser - 解析器
ESLint 底层默认使用 Espree来进行 AST 解析,这个解析器目前已经基于 Acron 来实现,虽然说 Acron 目前能够解析绝大多数的 ECMAScript 规范的语法,但还是不支持 TypeScript ,因此需要引入其他的解析器完成 TS 的解析。
社区提供了@typescript-eslint/parser这个解决方案,专门为了 TypeScript 的解析而诞生,将 TS 代码转换为 Espree 能够识别的格式(即 Estree 格式),然后在 Eslint 下通过Espree进行格式检查, 以此兼容了 TypeScript 语法。
module.exports = {
  parser:'@typescript-eslint/parser',
}
2. parserOptions - 解析器选项
这个配置可以对上述的解析器进行能力定制,默认情况下 ESLint 支持 ES5 语法,你可以配置这个选项,具体内容如下:
- ecmaVersion: 这个配置和
Acron的 ecmaVersion 是兼容的,可以配置ES + 数字(如 ES6)或者ES + 年份(如 ES2015),也可以直接配置为latest,启用最新的 ES 语法。 - sourceType: 默认为
script,如果使用 ES Module 则应设置为module - ecmaFeatures: 这是个对象,表示你想使用的额外的语言特性:
globalReturn- 允许在全局作用域下使用return语句impliedStrict- 启用全局 strict mode (如果ecmaVersion是 5 或更高)jsx- 启用 JSXexperimentalObjectRestSpread- 启用实验性的 object rest/spread properties 支持。(**重要:**这是一个实验性的功能,在未来可能会有明显改变。 建议你写的规则 不要 依赖该功能,除非当它发生改变时你愿意承担维护成本。)
module.exports = {
  parser:'@typescript-eslint/parser',
  parserOptions: {
    ecmaVersion: 'latest',
    sourceType: 'module',
    //ecmaFeatures:{}
  },
}
3. rules - 具体代码规则
rules 配置即代表在 ESLint 中手动调整哪些代码规则,比如禁止在 if 语句中使用赋值语句这条规则可以像如下的方式配置:
// .eslintrc.js
module.exports = {
  // 其它配置省略
  rules: {
    // key 为规则名,value 配置内容
    "no-cond-assign": ["error", "always"]
  }
}
在 rules 对象中,
key一般为规则名,value为具体的配置内容
在上述的例子中我们设置为一个数组 ["error", "always"],数组第一项为规则的 ID,第二项为规则的配置。
这里重点说一说规则的 ID,它的语法对所有规则都适用,你可以设置以下的值:
off或0: 表示关闭规则。warn或1: 表示开启规则,违背规则后只抛出warning,而不会导致程序退出。error或2: 表示开启规则,违背规则后抛出error,程序会退出。
具体的规则配置可能会不一样,有的是一个字符串,有的可以配置一个对象,你可以参考 ESLint 官方文档。
当然,你也能直接将
rules对象的value配置成 ID,如:"no-cond-assign": "error"。
4. plugins 插件
上面提到过 ESLint 的 parser 基于Acorn实现,不能直接解析 TypeScript,需要我们指定 parser 选项为@typescript-eslint/parser才能兼容 TS 的解析。
同理,ESLint 本身也没有内置 TypeScript 的代码规则,这个时候 ESLint 的插件系统就派上用场了。
我们需要通过添加 ESLint 插件来增加一些特定的规则,比如添加@typescript-eslint/eslint-plugin 来拓展一些关于 TS 代码的规则,如下代码所示:
// .eslintrc.js
module.exports = {
  // 添加 TS 规则,可省略`eslint-plugin`
  plugins: [
    'react',
    '@typescript-eslint',
  ]
}
值得注意的是,添加插件后只是拓展了 ESLint 本身的规则集,但 ESLint 默认并没有开启这些规则的校验!
如果要开启或者调整这些规则,你需要在 rules 中进行配置,如:
// .eslintrc.js
module.exports = {
  // 开启一些 TS 规则
  rules: {
    '@typescript-eslint/ban-ts-comment': 'error',
    '@typescript-eslint/no-explicit-any': 'warn',
  }
}
5. extends - 继承配置
extends 相当于
继承另外一份 ESLint 配置
可以配置为一个字符串,也可以配置成一个字符串数组。主要分如下 3 种情况:
- 从 ESLint 本身继承;
- 从类似
eslint-config-xxx的 npm 包继承; - 从 ESLint 插件继承。
// .eslintrc.js
module.exports = {
   "extends": [
     // 第1种情况
     "eslint:recommended",
     // 第2种情况,一般配置的时候可以省略 `eslint-config`
     "standard"
     // 第3种情况,可以省略包名中的 `eslint-plugin`
     // 格式一般为: `plugin:${pluginName}/${configName}`
     "plugin:react/recommended"
     "plugin:@typescript-eslint/recommended",
   ]
}
有了 extends 的配置,对于之前所说的 ESLint 插件中的繁多配置,我们就不需要手动一一开启了,通过 extends 字段即可自动开启插件中的推荐规则:
extends: ["plugin:@typescript-eslint/recommended"]
6. env 和 globals
这两个配置分别表示运行环境和全局变量,在指定的运行环境中会预设一些全局变量,比如:
// .eslint.js
module.export = {
  "env": {
    "browser": "true",
    "node": "true"
  }
}
指定上述的
env配置后便会启用浏览器和 Node.js 环境,这两个环境中的一些全局变量(如window、global等)会同时启用。
有些全局变量是业务代码引入的第三方库所声明,这里就需要在globals配置中声明全局变量了。每个全局变量的配置值有 3 种情况:
"writable"或者true,表示变量可重写;"readonly"或者false,表示变量不可重写;"off",表示禁用该全局变量。
jquery举例,我们可以在配置文件中声明如下:
// .eslintrc.js
module.exports = {
  "globals": {
    //变量不可重写;
    "$": false, //"readonly"

    // 变量可重写;
    "jQuery": true // writable
  }
}
尝试执行一下检查!
目前完整的配置文件
module.exports = {
  parser:'@typescript-eslint/parser',
  env: {
    browser: true,
    es2021: true
  },
  extends: [
    'plugin:react/recommended',
    'standard-with-typescript',
    "plugin:@typescript-eslint/recommended"
  ],
  overrides: [
  ],
  parserOptions: {
    ecmaVersion: 'latest',
    sourceType: 'module',
    //ecmaFeatures:{}
  },
  plugins: [
    'react',
    '@typescript-eslint',
  ],
  rules: {
    '@typescript-eslint/ban-ts-comment': 'error',
    '@typescript-eslint/no-explicit-any': 'warn',
  }
}
首先在package.json配置eslint的检查命令!
  "scripts": {
     // 检查脚本文件
    "lint:script": "eslint --ext .js,.jsx,.ts,.tsx --fix --quiet ./"
  },
如果执行后发现了类似这样的报错 You have used a rule which requires parserServices to be generated. You must therefore provide a value for the "parserOptions.project" property for @typescript-eslint/parser.
╭─ ~/CunWangOwn/FE/temp-vite ────────────────────────────────────────────────────────── 2 ✘ at 11:29:21 ─╮
╰─ npm run lint:script ─╯
> temp-vite@0.0.0 lint:script
> eslint --ext .js,.jsx,.ts,.tsx --fix --quiet ./
Oops! Something went wrong! :(
ESLint: 8.28.0
Error: Error while loading rule '@typescript-eslint/dot-notation': You have used a rule which requires parserServices to be generated. You must therefore provide a value for the "parserOptions.project" property for @typescript-eslint/parser.
加载规则“@typescript-eslint/dot-notation”时:您使用了需要生成@typescript-eslint/parser解析器服务的规则。因此,您必须为 @typescript-eslint/parser 的 “parserOptions.project” 属性提供一个值。这个值是tsconfig.json的文件路径(相对路径就可以!)这样eslint可以通过rule来检查语法,也可以通过读取typescript的配置来检查语法!
  parserOptions: {
    ecmaVersion: 'latest',
    sourceType: 'module',
  + project:["tsconfig.json"]
  },
然后再次执行 !npm run lint:script
╭─ ~/CunWangOwn/FE/temp-vite ────────────────────────────────────────────────────────── 1 ✘ at 11:42:29 ─╮
╰─ npm run lint:script ─╯
> temp-vite@0.0.0 lint:script
> eslint --ext .js,.jsx,.ts,.tsx --fix --quiet ./
Warning: React version not specified in eslint-plugin-react settings. See https://github.com/jsx-eslint/eslint-plugin-react#configuration .
/Users/codehope/CunWangOwn/FE/temp-vite/src/App.tsx
5:1 error Missing return type on function @typescript-eslint/explicit-function-return-type
/Users/codehope/CunWangOwn/FE/temp-vite/src/vite-env.d.ts
1:1 error Do not use a triple slash reference for vite/client, use `import` style instead @typescript-eslint/triple-slash-reference
✖ 2 problems (2 errors, 0 warnings)
可以看到!上面就是正常的 eslint 抛出的提示!
Prettier 格式化代码
虽然 ESLint 本身具备自动格式化代码的功能(eslint --fix),但术业有专攻,ESLint 的主要优势在于代码的风格检查并给出提示
而在代码格式化这一块 Prettier 做的更加专业,因此我们经常将 ESLint 结合 Prettier 一起使用。
首先我们来安装一下 Prettier:
pnpm install --save-dev --save-exact prettier
然后,创建一个空的配置文件 .prettierrc.js,让编辑器和其他工具知道你正在使用 Prettier。
// .prettierrc.js
module.exports = {
  printWidth: 80, //一行的字符数,如果超过会进行换行,默认为80
  tabWidth: 2, // 一个 tab 代表几个空格数,默认为 2 个
  useTabs: false, //是否使用 tab 进行缩进,默认为false,表示用空格进行缩减
  singleQuote: true, // 字符串是否使用单引号,默认为 false,使用双引号
  semi: true, // 行尾是否使用分号,默认为true
  trailingComma: "none", // 是否使用尾逗号
  bracketSpacing: true // 对象大括号直接是否有空格,默认为 true,效果:{ a: 1 }
};
然后我们配置一下!package.json 来执行 Prettier 格式化
  "scripts": {
    "prettier": "prettier --write ."
  },
然后执行一下!
╭─ ~/CunWangOwn/FE/temp-vite on master ──────────────────────────────────────────── ✔ at 12:02:45 ─╮
╰─ npm run prettier ─╯
> temp-vite@0.0.0 prettier
> prettier --write .
.eslintrc.cjs 50ms
.prettierrc.cjs 11ms
package.json 4ms
pnpm-lock.yaml 407ms
postcss.config.cjs 32ms
src/App.css 39ms
src/App.tsx 195ms
src/index.css 15ms
src/main.tsx 6ms
src/vite-env.d.ts 4ms
tailwind.config.cjs 4ms
tsconfig.json 6ms
tsconfig.node.json 2ms
vite.config.ts 7ms
可以看到有哪些文件被执行了格式化!用时多久这些信息说明这些已经根据我们的配置格式化成功了!
如果有的文件我们不想让他格式化!比如package.json 这个文件,那怎么做呢?
其实和 .gitignore 使用起来差不多的。创建一个.prettierignore文件,让Prettier CLI和编辑人员知道哪些文件不需要格式化。
//.prettierignore
# Ignore all HTML files:
*.html
package.json
执行日志中,你就发现少了 package.json 的格式化!
╭─ ~/CunWangOwn/FE/temp-vite on master !13 ──────────────────────────────────────── ✔ at 12:04:51 ─╮
╰─ npm run prettier ─╯
> temp-vite@0.0.0 prettier
> prettier --write .
.eslintrc.cjs 50ms
.prettierrc.cjs 9ms
pnpm-lock.yaml 394ms
postcss.config.cjs 34ms
src/App.css 38ms
src/App.tsx 152ms
src/index.css 19ms
src/main.tsx 9ms
src/vite-env.d.ts 3ms
tailwind.config.cjs 4ms
tsconfig.json 6ms
tsconfig.node.json 2ms
vite.config.ts 5ms
Prettier ESLint 强强联合
首先安装两个工具包:
pnpm i eslint-config-prettier eslint-plugin-prettier -D
eslint-config-prettier用来覆盖 ESLint 本身的规则配置eslint-plugin-prettier则是用于让 Prettier 来接管eslint --fix即修复代码的能力。
在 .eslintrc.js 配置文件中接入 prettier 的相关工具链
这里直接放完整的配置了
module.exports = {
  parser: '@typescript-eslint/parser',
  env: {
    browser: true,
    es2021: true
  },

  extends: [
    'plugin:react/recommended',
    'standard-with-typescript',
    'plugin:@typescript-eslint/recommended',
    // 1. 接入 prettier 的规则
    "prettier",
    "plugin:prettier/recommended"
  ],
  overrides: [],
  parserOptions: {
    ecmaVersion: 'latest',
    sourceType: 'module',
    project: ['tsconfig.json']
    //ecmaFeatures:{}
  },
  // 2. 加入 prettier 的 eslint 插件
  plugins: ['react', '@typescript-eslint', "prettier"],
  rules: {
     // 3. 注意要加上这一句,开启 prettier 自动修复的功能
     "prettier/prettier": "error",
    '@typescript-eslint/ban-ts-comment': 'error',
    '@typescript-eslint/no-explicit-any': 'warn'
  }
};
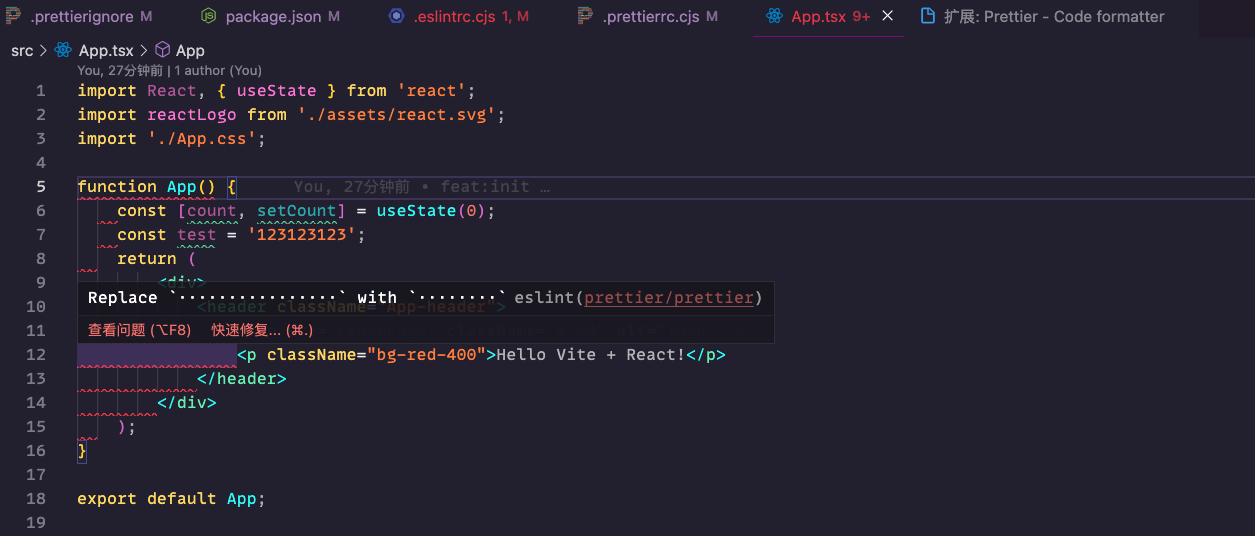
然后我们来执行一下 eslint 的命令,可以看到下图的效果!
不过每次执行这个命令未免会有些繁琐,我们可以在VSCode中安装ESLint和Prettier这两个插件,并且在设置区中开启Format On Save:
装了eslint 插件 就发现直接不用执行 代码中就能看到哪些有问题了!
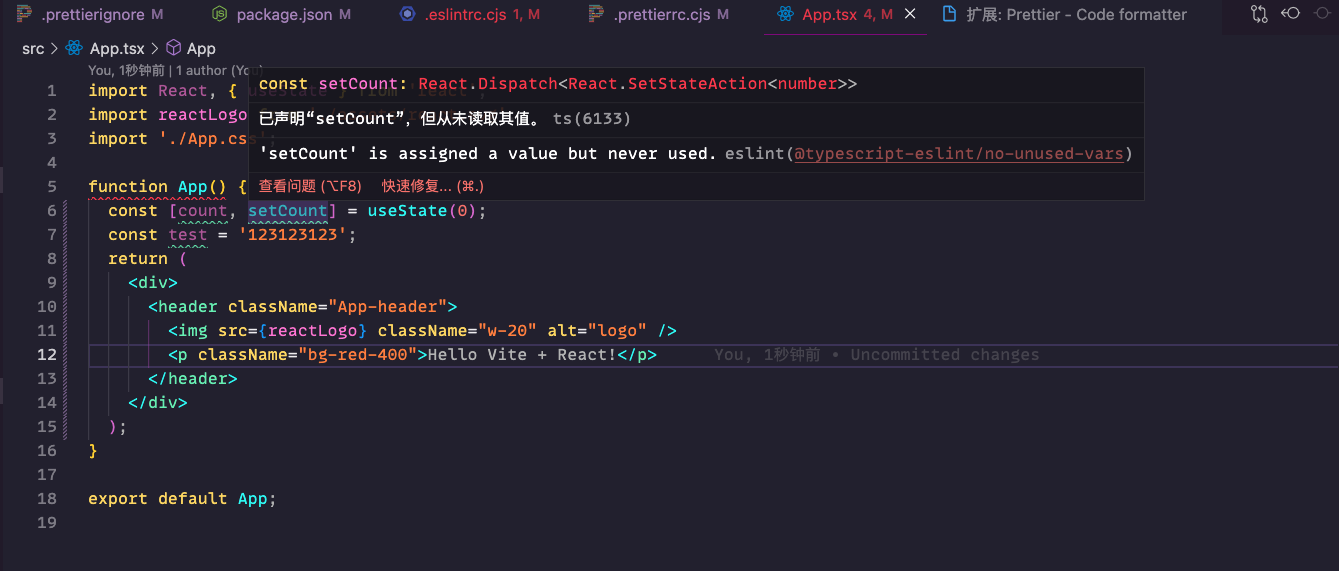
装了 Prettier 也会有一些格式问题的提示!(感觉好像是eslint中支持Prettier配置后的提示!)
你可以在vscode 配置默认格式化程序为 Prettier 然后就会按照配置文件去格式化啦!
PS.遇到不生效的情况可以试试重启VSCODE!
在 Vite 中接入 ESLint
【这里一直没有成功~ 不知道是不是版本问题!】(tmd 原来控制台不会直接报错的!可能是选择配置的时候,选择了浏览器环境的问题~需要打开浏览器才行!)
首先我们安装 Vite 中的 ESLint 插件:
pnpm i vite-plugin-eslint -D
然后在 vite.config.ts 中接入:
// vite.config.ts
import viteEslint from 'vite-plugin-eslint';

// 具体配置
{
  plugins: [
    // 省略其它插件
    viteEslint(),
  ]
}
然后我们写点eslint会报错的代码~

然后去运行,会发现一开始是不会报错的!当浏览器运行了才去报错!我一直以为这里是没有生效~ 淦!
样式规范工具:Stylelint
- 使用npm来安装Stylelint和它的标准配置。
npm install --save-dev stylelint stylelint-config-standard
- 在你项目的根目录下创建一个
.stylelintrc.json或者.stylelintrc.js配置文件,内容如下。
module.exports = {
    extends: [
        "stylelint-config-standard"
    ]
}
- 在你的项目中所有的CSS文件上运行Stylelint。
npx stylelint "**/*.css"
或者配置package.json脚本
  "scripts": {
    "stylelint": "stylelint **/*.css "
  },
- 执行测试一下!
❯ npm run stylelint

> vite-project@0.0.0 stylelint
> stylelint **/*.css


src/index.css
  2:5   ✖  Expected indentation of 2 spaces                          indentation
  3:5   ✖  Expected indentation of 2 spaces                          indentation
  4:5   ✖  Expected indentation of 2 spaces                          indentation
  5:5   ✖  Expected indentation of 2 spaces                          indentation
  7:5   ✖  Unexpected empty line before declaration                  declaration-empty-line-before
  7:5   ✖  Expected indentation of 2 spaces                          indentation
  8:5   ✖  Expected indentation of 2 spaces                          indentation
  8:12  ✖  Expected modern color-function notation                   color-function-notation
  8:32  ✖  Expected "0.87" to be "87%"                               alpha-value-notation
  9:5   ✖  Expected indentation of 2 spaces                          indentation
 11:5   ✖  Unexpected empty line before declaration                  declaration-empty-line-before
 11:5   ✖  Expected indentation of 2 spaces                          indentation
 12:5   ✖  Expected indentation of 2 spaces                          indentation
 12:21  ✖  Expected "optimizeLegibility" to be "optimizelegibility"  value-keyword-case
 13:5   ✖  Expected indentation of 2 spaces                          indentation
 14:5   ✖  Expected indentation of 2 spaces                          indentation
 15:5   ✖  Unexpected vendor-prefix "-webkit-text-size-adjust"       property-no-vendor-prefix
 15:5   ✖  Expected indentation of 2 spaces                          indentation
 19:5   ✖  Expected indentation of 2 spaces                          indentation
 20:5   ✖  Expected indentation of 2 spaces                          indentation
 21:5   ✖  Expected indentation of 2 spaces                          indentation
 23:1   ✖  Expected empty line before rule                           rule-empty-line-before
 24:5   ✖  Expected indentation of 2 spaces                          indentation
 28:5   ✖  Expected indentation of 2 spaces                          indentation
 29:5   ✖  Expected indentation of 2 spaces                          indentation
 30:5   ✖  Expected indentation of 2 spaces                          indentation
 31:5   ✖  Expected indentation of 2 spaces                          indentation
 32:5   ✖  Expected indentation of 2 spaces                          indentation
 36:5   ✖  Expected indentation of 2 spaces                          indentation
 37:5   ✖  Expected indentation of 2 spaces                          indentation
 41:5   ✖  Expected indentation of 2 spaces                          indentation
 42:5   ✖  Expected indentation of 2 spaces                          indentation
 43:5   ✖  Expected indentation of 2 spaces                          indentation
 44:5   ✖  Expected indentation of 2 spaces                          indentation
 45:5   ✖  Expected indentation of 2 spaces                          indentation
 46:5   ✖  Expected indentation of 2 spaces                          indentation
 47:5   ✖  Expected indentation of 2 spaces                          indentation
 48:5   ✖  Expected indentation of 2 spaces                          indentation
 49:5   ✖  Expected indentation of 2 spaces                          indentation
 51:1   ✖  Expected empty line before rule                           rule-empty-line-before
 52:5   ✖  Expected indentation of 2 spaces                          indentation
 54:1   ✖  Expected empty line before rule                           rule-empty-line-before
 56:5   ✖  Expected indentation of 2 spaces                          indentation
 60:5   ✖  Expected indentation of 2 spaces                          indentation
 61:9   ✖  Expected indentation of 4 spaces                          indentation
 62:9   ✖  Expected indentation of 4 spaces                          indentation
 62:27  ✖  Expected "#ffffff" to be "#fff"                           color-hex-length
 63:5   ✖  Expected indentation of 2 spaces                          indentation
 64:5   ✖  Expected empty line before rule                           rule-empty-line-before
 64:5   ✖  Expected indentation of 2 spaces                          indentation
 65:9   ✖  Expected indentation of 4 spaces                          indentation
 66:5   ✖  Expected indentation of 2 spaces                          indentation
 67:5   ✖  Expected empty line before rule                           rule-empty-line-before
 67:5   ✖  Expected indentation of 2 spaces                          indentation
 68:9   ✖  Expected indentation of 4 spaces                          indentation
 69:5   ✖  Expected indentation of 2 spaces                          indentation
56 problems (56 errors, 0 warnings)
可以看到它执行检查的css文件,和一些不符合标准规范的异常!
如果你在Stylelint旁边使用了Prettier,你应该关闭任何冲突的规则。
例如,你可以使用Prettier的共享配置来做到这一点。
安装stylelint-config-prettier
pnpm install --save-dev stylelint-config-prettier
{
    "extends": [
        "stylelint-config-standard",
        "stylelint-config-prettier"
    ]
}
操作日志:你会发现日志少了很多
少了的都是类似 7:5 ✖ Expected indentation of 2 indentation 此类格式化的日志!因为已经使用了prettier的格式化规范,把 "stylelint-config-standard" 给覆盖了!
❯ pnpm install --save-dev stylelint-config-prettier
Packages: +1
+
Progress: resolved 426, reused 405, downloaded 0, added 1, done

devDependencies:
+ stylelint-config-prettier 9.0.4
❯ npm run stylelint

> vite-project@0.0.0 stylelint
> stylelint **/*.css


src/index.css
  7:5   ✖  Unexpected empty line before declaration                  declaration-empty-line-before
  8:12  ✖  Expected modern color-function notation                   color-function-notation
  8:32  ✖  Expected "0.87" to be "87%"                               alpha-value-notation
 11:5   ✖  Unexpected empty line before declaration                  declaration-empty-line-before
 12:21  ✖  Expected "optimizeLegibility" to be "optimizelegibility"  value-keyword-case
 15:5   ✖  Unexpected vendor-prefix "-webkit-text-size-adjust"       property-no-vendor-prefix
 23:1   ✖  Expected empty line before rule                           rule-empty-line-before
 51:1   ✖  Expected empty line before rule                           rule-empty-line-before
 54:1   ✖  Expected empty line before rule                           rule-empty-line-before
 62:27  ✖  Expected "#ffffff" to be "#fff"                           color-hex-length
 64:5   ✖  Expected empty line before rule                           rule-empty-line-before
 67:5   ✖  Expected empty line before rule                           rule-empty-line-before
12 problems (12 errors, 0 warnings)
Stylelint 配置Scss
pnpm i stylelint stylelint-prettier stylelint-config-prettier stylelint-config-recess-order stylelint-config-standard stylelint-config-standard-scss -D
stylelint-prettier注册 stylelint 的 prettier 插件stylelint-config-prettier接入 Prettier 规则stylelint-config-recess-order样式属性顺序规则stylelint-config-standardstandard 规则集合stylelint-config-standard-scssstandard 规则集合的 scss 版本
我们在 Stylelint 的配置文件.stylelintrc.js中一一使用这些工具套件:
// .stylelintrc.js
module.exports = {
    // 注册 stylelint 的 prettier 插件
    plugins: ['stylelint-prettier'],
    // 继承一系列规则集合
    extends: [
        // standard 规则集合
        'stylelint-config-standard',
        // standard 规则集合的 scss 版本
        'stylelint-config-standard-scss',
        // 样式属性顺序规则
        'stylelint-config-recess-order',
        // 接入 Prettier 规则
        'stylelint-config-prettier',
        'stylelint-prettier/recommended'
    ],
    // 配置 rules
    rules: {
        // 开启 Prettier 自动格式化功能
        'prettier/prettier': true
    }
};
然后我们重新配置一下npm脚本!分别是检查和格式化并修复css的问题!
    "lint:checkStyle": "stylelint  \"src/**/*.{css,scss}\"",
    "lint:fixStyle": "stylelint --fix \"src/**/*.{css,scss}\""
:root {
  font-family: Inter, Avenir, Helvetica, Arial, sans-serif;
    background-color: #ffffff;
}
上面的css代码有两个问题
#ffffff可以优化为"#fff"[Expected "#ffffff" to be "#fff" color-hex-length]- 缩进问题!prettier 中配置的 缩进为2 这里为4
我们先执行一下检查,可以看到已经检测出了这两个问题,而且格式化也是按照prettier的格式化提示的问题!
❯ npm run lint:checkStyle

> vite-project@0.0.0 lint:checkStyle
> stylelint  "src/**/*.{css,scss}"


src/index.scss
 7:3   ✖  Delete "··"                      prettier/prettier
 7:23  ✖  Expected "#ffffff" to be "#fff"  color-hex-length

2 problems (2 errors, 0 warnings)
然后我们执行一下修复命令!
你也可以在 VSCode 中安装Stylelint插件,这样能够在开发阶段即时感知到代码格式问题,提前进行修复。安装好后在当前项目创建.vscode文件夹,创建setting.json文件,写入下面的配置
{
    "stylelint.validate": [
        "css",
        "scss"
    ]
}
然后就可以看到编辑器已经有了相关的提示!

Vite引入 Stylelint 插件
社区中提供了 Stylelint 的 Vite 插件,实现在项目开发阶段提前暴露出样式代码的规范问题。我们来安装一下这个插件:
pnpm install vite-plugin-stylelint -D
然后在 Vite 配置文件中添加如下的内容:
import viteStylelint from 'vite-plugin-stylelint';

export default defineConfig({
  plugins: [
    viteStylelint({
      fix: false // 是否自动修复
    })
  ],
});
因为我们的配置没有开启自动修复!所以有问题会直接报错!

如果开启了,则会自动帮我们修复!
Husky + lint-staged 的 Git 提交工作流集成
提交前的代码 Lint 检查
上文中我们提到了安装
ESLint、Prettier和Stylelint的 VSCode 插件或者 Vite 插件,在开发阶段提前规避掉代码格式的问题,但实际上这也只是将问题提前暴露,并不能保证规范问题能完全被解决,还是可能导致线上的代码出现不符合规范的情况。那么如何来避免这类问题呢?
我们可以在 代码提交的时候进行卡点检查,也就是拦截 git commit 命令,进行代码格式检查
先配置一下package.json的配置,让一个命令能执行 stylelint 和 eslint
"lint": "npm run lint:script && npm run lint:checkStyle"
然后呢~只有确保通过格式检查才允许正常提交代码。社区中已经有了对应的工具——Husky来完成这件事情,让我们来安装一下这个工具:
pnpm i husky -D
值得提醒的是,有很多人推荐在 package.json 中配置 husky 的钩子:
// package.json
{
  "husky": {
    "pre-commit": "npm run lint"
  }
}
这种做法在 Husky 4.x 及以下版本没问题,而在最新版本(7.x 版本)中是无效的!在新版 Husky 版本中,我们需要做如下的事情:
- 初始化 Husky:
npx husky install,并将husky install作为项目启动前脚本,如:
{
  "scripts": {
    // 会在安装 npm 依赖后自动执行
    "prepare": "husky install"
  }
}
然后执行一下! npm run prepare
❯ npm run prepare

> vite-project@0.0.0 prepare
> husky install

husky - Git hooks installed
就帮我们安装了一个Git的hooks,项目目录下会多出 .husky 文件夹
.husky
└── _
    └── husky.sh
- 添加 Husky 钩子,在终端执行如下命令:
npx husky add .husky/pre-commit "npm run lint"
接着你将会在项目根目录的.husky目录中看到名为pre-commit的文件,里面包含了 git commit前要执行的脚本。
├── _
│   └── husky.sh
└── pre-commit
#!/usr/bin/env sh
. "$(dirname -- "$0")/_/husky.sh"

npm run lint
现在,当你执行 git commit 的时候,会首先执行 npm run lint脚本,通过 Lint 检查后才会正式提交代码记录。
❯ git commit -m'feat: 测试 检查 commit'

> vite-project@0.0.0 lint
> npm run lint:script && npm run lint:checkStyle

> vite-project@0.0.0 lint:script
> eslint --ext .js,.jsx,.ts,.tsx --fix --quiet ./

Warning: React version not specified in eslint-plugin-react settings. See https://github.com/jsx-eslint/eslint-plugin-react#configuration .

> vite-project@0.0.0 lint:checkStyle
> stylelint  "src/**/*.{css,scss}"

src/index.scss
 7:21  ✖  Expected "#ffffff" to be "#fff"  color-hex-length

1 problem (1 error, 0 warnings)
可以看到 commit 的确执行了 lint检查!上面并没有通过检查!然后我们查看一下git log,并没有我们刚刚提交的commit
commit 62fb174d754eb031bfb97ea1e13105801af48fe5
Author: 白粥大侠 <hope@baizhoudaxiadeMacBook-Pro.local>
Date:   Mon Dec 5 17:55:24 2022 +0800

    feat: 测试
..
不过,刚才我们直接在 Husky 的钩子中执行 npm run lint,这会产生一个额外的问题:
Husky 中每次执行
npm run lint都对仓库中的代码进行全量检查,也就是说,即使某些文件并没有改动,也会走一次 Lint 检查,当项目代码越来越多的时候,提交的过程会越来越慢,影响开发体验。
而 lint-staged 就是用来解决上述全量扫描问题的,可以实现只对存入暂存区的文件进行 Lint 检查,大大提高了提交代码的效率。首先,让我们安装一下对应的 npm 包:
pnpm i -D lint-staged
然后在 package.json中添加如下的配置:
{
  "lint-staged": {
    "**/*.{js,jsx,tsx,ts}": [
      "npm run lint:script",
      "git add ."
    ],
    "**/*.{scss}": [
      "npm run lint:checkStyle",
      "git add ."
    ]
  }
}
接下来我们需要在 Husky 中应用lint-stage,回到.husky/pre-commit脚本中,将原来的npm run lint换成如下脚本:
#!/usr/bin/env sh
. "$(dirname -- "$0")/_/husky.sh"

- npm run lint
+ npx --no -- lint-staged
如此一来,我们便实现了提交代码时的增量 Lint 检查。
测试一下新增一个 test.scss 里面同样放一段有问题的代码~!
.app {
  background-color: #ffffff; // ✖  Expected "#ffffff" to be "#fff"  color-hex-length
}
执行git提交日志:在下面可以看到他执行只为了暂存区的文件,并且正确的找到了暂存区的test.scss文件,并且找到了问题!

如此一来,我们便实现了提交代码时的增量 Lint 检查。

提交时的 commit 信息规范
除了代码规范检查之后,Git 提交信息的规范也是不容忽视的一个环节,规范的 commit 信息能够方便团队协作和问题定位。
首先我们来安装一下需要的工具库,执行如下的命令:
pnpm i commitlint @commitlint/cli @commitlint/config-conventional -D
接下来新建commitlint.config.cjs:
// commitlint.config.cjs
module.exports = {
    extends: ["@commitlint/config-conventional"]
};
一般我们直接使用 @commitlint/config-conventional 规范集就可以了
它所规定的 commit 信息一般由两个部分: type 和 subject 组成,结构如下:
// type 指提交的类型
// subject 指提交的摘要信息
<type>: <subject>
常用的 type 值包括如下:
feat: 添加新功能。fix: 修复 Bug。chore: 一些不影响功能的更改。docs: 专指文档的修改。perf: 性能方面的优化。refactor: 代码重构。test: 添加一些测试代码等等。
接下来我们将commitlint的功能集成到 Husky 的钩子当中,在终端执行如下命令即可:
npx husky add .husky/commit-msg "npx --no-install commitlint -e $HUSKY_GIT_PARAMS"
你可以发现在.husky目录下多出了commit-msg脚本文件,表示commitlint命令已经成功接入到 husky 的钩子当中.
❯ tree .husky
.husky
├── _
│   └── husky.sh
├── commit-msg
└── pre-commit

1 directory, 3 files
commit-msg 文件
#!/usr/bin/env sh
. "$(dirname -- "$0")/_/husky.sh"

npx --no-install commitlint -e
现在我们可以尝试对代码进行提交,假如输入一个错误的 commit 信息,commitlint 会自动抛出错误并退出:

可以看到已经成功的可以监听到我们 commit 信息不规范的问题了!
至此,我们便完成了 Git 提交信息的卡点扫描和规范检查。!
小结
3 个方面的自动化代码规范工具:
- JavaScript/TypeScript 规范。主流的 Lint 工具包括
Eslint、Prettier; - 样式开发规范。主流的 Lint 工具包括
Stylelint、Prettier; - Git 提交规范。主流的 Lint 工具包括
Commitlint
通过
Husky+lint-staged成功地拦截git commit过程,只有在各项 Lint 检查通过后才能正常提交代码,这样就有效提高了线上代码和Git提交信息的质量。
评论区