


手动处理 Vue 文件并渲染到页面
手动编译 .vue文件
<template>
    <div class="message">{{ message }}</div>
  </template>

  <script>
  import { ref } from "vue";

  export default {
    name: "Main",
    setup() {
      const message = ref("Main");
      return {
        message,
      };
    },
  };
  </script>

  <style scoped>
  .message {
    font-size: 60px;
    font-weight: 900;
  }
  </style>
- Vue 提供了
@vue/compiler-sfc,专门用于 Vue 文件的预编译。 - fs-extra 操作文件用的
const { readFile, writeFile } = require("fs-extra")
const { parse } = require("@vue/compiler-sfc")


async function main() {
    const filePath = "/Users/xiaohao/code/for-chrom-blog/ compile/main.vue"
    const file = await readFile(filePath, "utf8");
    const { descriptor, error } = parse(file);

    console.log(JSON.stringify(descriptor))
}

main()
我们来看看解析出来的内容
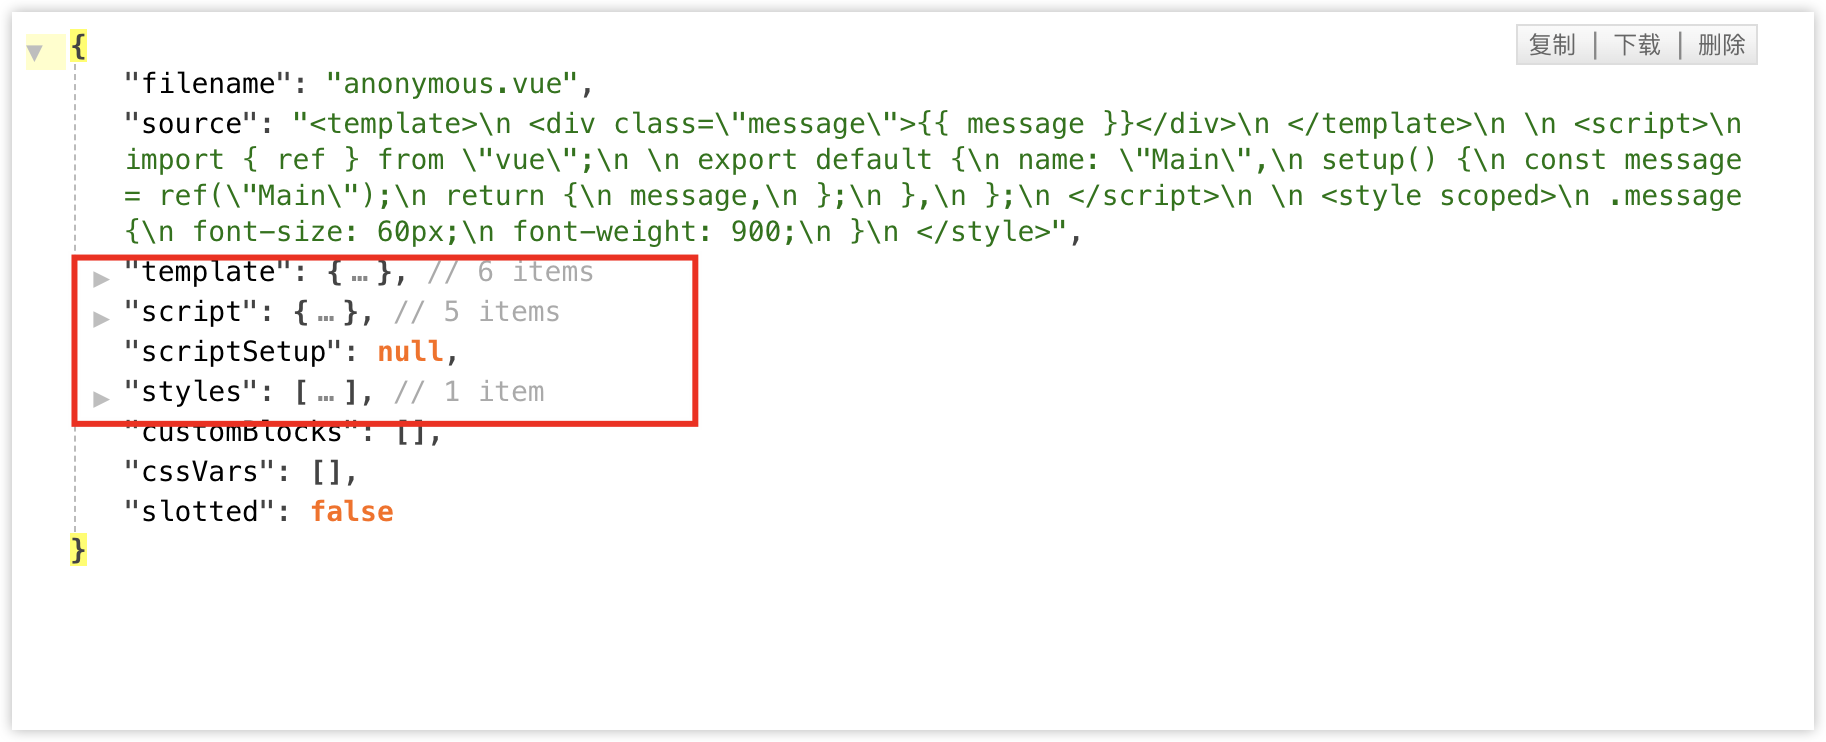
其实 parse 函数,就是把一个 Vue 文件,分成 3 个部分:
template块script块和scriptSetup块- 多个
style块
这一步做的是解析,其实并没有对代码进行编译,可以看到,每个块的 content 字段,都是跟 Vue 文件是相同的。
script 包括 script 块和 scriptSetup 块,scriptSetup 是为null,是因为刚好我们的 Vue 文件,没有使用 script setup 的特性,因此它的值为空。
style 块允许有多个,因为可以同时出现多个 style 标签,而其他标签只能有一个(script 和 script setup 能同时存在各一个)。
解析的目的,是将一个 Vue 文件中的内容,拆分成不同的块,然后分别对它们进行编译
编译 script
编译 script 的目的有如下几个:
- 处理
script setup的代码,script setup的代码是不能直接运行的,需要进行转换。 - 合并
script和script setup的代码。 - 处理 CSS 变量注入
const { parse, compileScript } = require("@vue/compiler-sfc")

// 这个 id 是 scopeId,用于 css scope,保证唯一即可
const id = Date.now().toString();
const scopeId = `data-v-${id}`;
// 编译 script,因为可能有 script setup,还要进行 css 变量注入
const script = compileScript(descriptor, { id: scopeId });
console.log(script)
编译后的script
import { ref } from "vue";

export default {
  name: "Main",
  setup() {
    const message = ref("Main");
    return {
      message,
    };
  },
};
可以看出编译后的 script没有变化,因为这里的确不需要任何处理。
编译 template
编译
template,目的是将template转成render函数
// 编译模板,转换成 render 函数
const template = compileTemplate({
    source: descriptor.template.content,
    filename: "main.vue", // 用于错误提示
    id: scopeId,
});
console.log(template)
compileTemplate 函数返回值如下:
大致这个格式我就不全部复制了
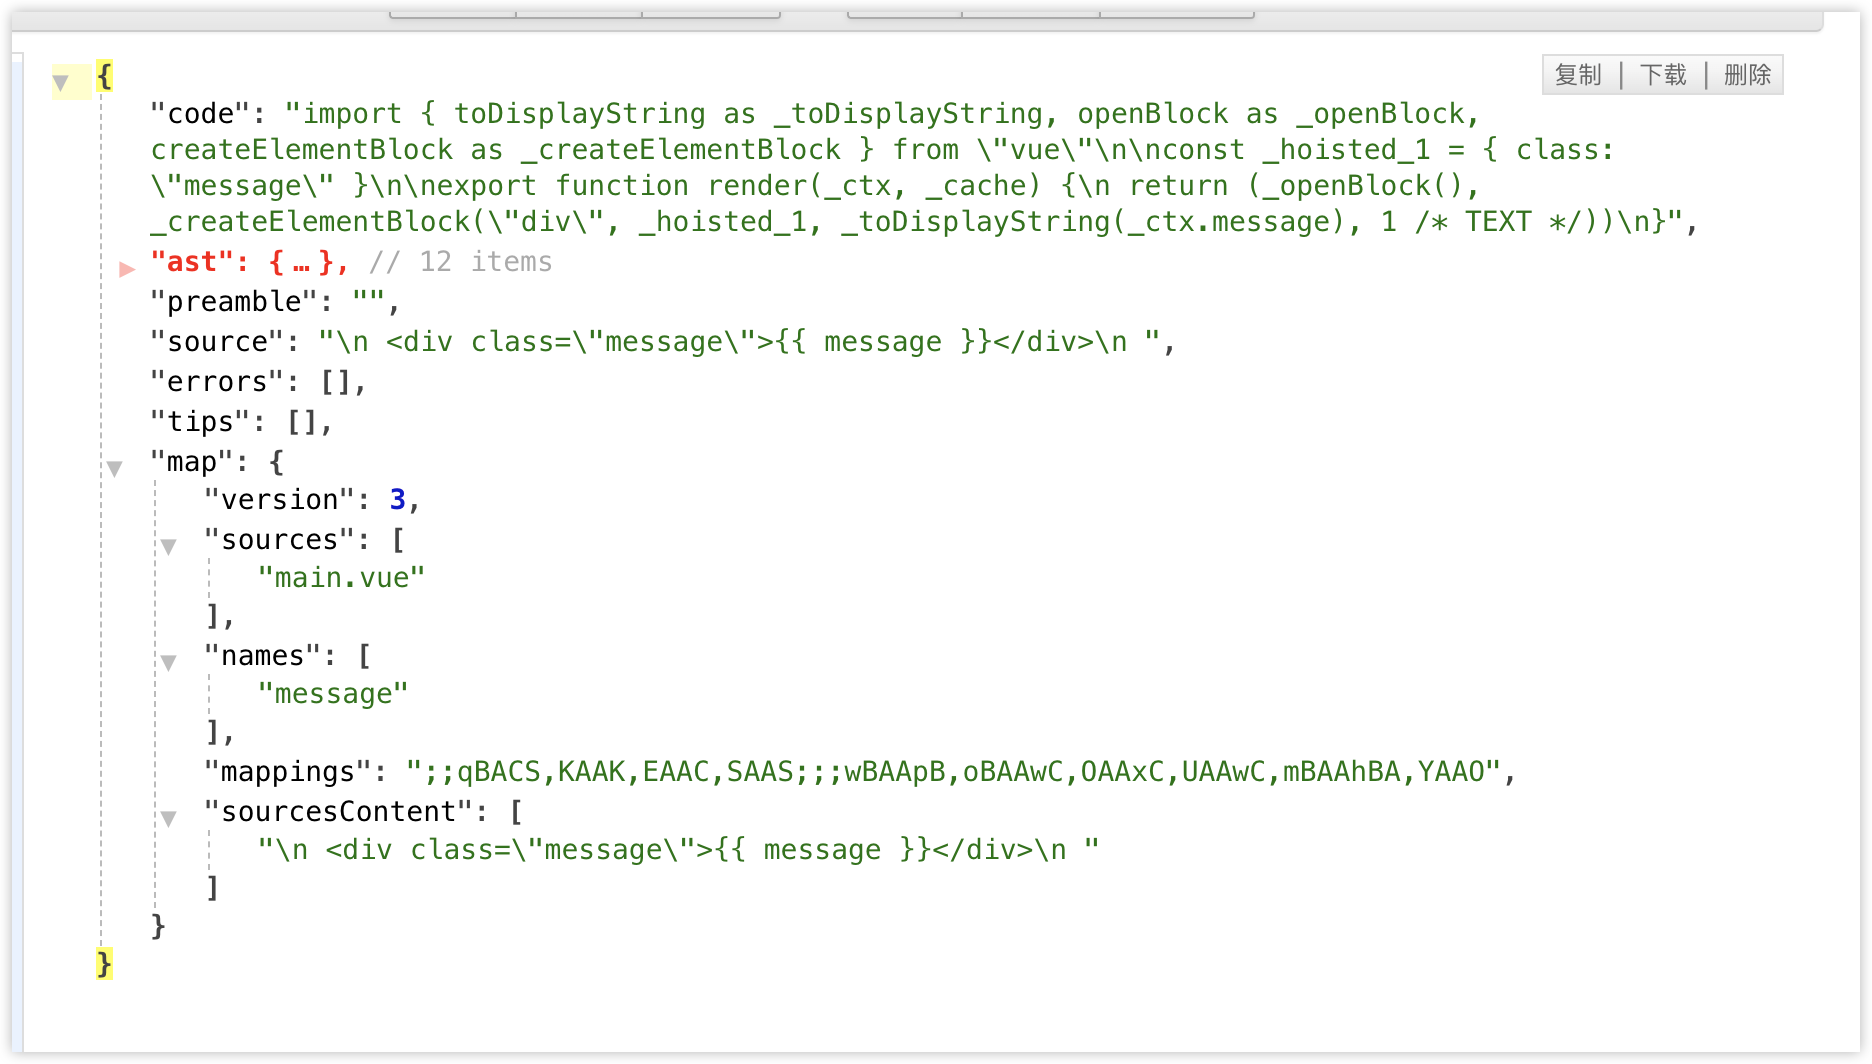
code字段里面其实就是真正的render函数
import { toDisplayString as _toDisplayString, openBlock as _openBlock, createElementBlock as _createElementBlock } from "vue"

const _hoisted_1 = { class: "message" }

export function render(_ctx, _cache) {
  return (_openBlock(), _createElementBlock("div", _hoisted_1, _toDisplayString(_ctx.message), 1 /* TEXT */))
}
_createElementBlock 当成 Vue.h 渲染函数来看
现在有了 script 和 render 函数,其实已经是可以把一个组件显示到页面上了,样式可以先不管,我们先把组件渲染出来,然后再加上样式
组合 script 和 render 函数
目前 script 和 render 函数,它们都是各自一个模块,而我们需要的是一个完整的 Vue 对象,即 **render **函数需要作为 Vue 对象的一个属性。
直接将 script 和 template 这两个模块**内联到代码中
// 用于存放代码,最后 join('\n') 合并成一份完整代码
const codeList = [];
codeList.push(script.content);
codeList.push(template.code);

const code = codeList.join('\n')
但这样做,其实是不行的,得到下面的内容
 import { ref } from "vue";

  export default {
    name: "Main",
    setup() {
      const message = ref("Main");
      return {
        message,
      };
    },
  };

import { toDisplayString as _toDisplayString, openBlock as _openBlock, createElementBlock as _createElementBlock } from "vue"

const _hoisted_1 = { class: "message" }

export function render(_ctx, _cache) {
  return (_openBlock(), _createElementBlock("div", _hoisted_1, _toDisplayString(_ctx.message), 1 /* TEXT */))
}
因为用的是 export default,组件没有存储到变量中,我们没法给 Vue 组件设置 **render** 函数
因此,@vue/compiler-sfc 贴心地给我们提供了一个工具函数 rewriteDefault,他的作用
rewriteDefault(content,varname) 将export 的 content解析到varname这个变量上面
因为上面解析出来的 script.content 就是下面的内容
export default {
    name: "Main",
    setup() {
      const message = ref("Main");
      return {
        message,
      };
    },
  };
我们需要将其解析成一个可用的变量
rewriteDefault(script.content,"__sfc_main")
那我们现在就可以合成代码了:
const { readFile, writeFile } = require("fs-extra")
const { parse, compileScript, compileTemplate, rewriteDefault } = require("@vue/compiler-sfc")

async function main() {
    const filePath = "/Users/xiaohao/code/for-chrom-blog/ compile/main.vue"
    const file = await readFile(filePath, "utf8");
    const { descriptor, error } = parse(file);


    // 这个 id 是 scopeId,用于 css scope,保证唯一即可
    const id = Date.now().toString();
    const scopeId = `data-v-${id}`;

    // 编译 script,因为可能有 script setup,还要进行 css 变量注入
    const script = compileScript(descriptor, { id: scopeId });
    // 编译模板,转换成 render 函数
    const template = compileTemplate({
        source: descriptor.template.content,
        filename: "main.vue", // 用于错误提示
        id: scopeId,
    });
    const codeList = [];

    // // 重写 default
    codeList.push(rewriteDefault(script.content, "__sfc_main__"));
    codeList.push(`__sfc_main__.__scopeId='${scopeId}'`);

    codeList.push(template.code);
    codeList.push(`__sfc_main__.render=render`);
    codeList.push(`export default __sfc_main__`);
    const code = codeList.join('\n')
    // 将合成的代码写到本地
    await writeFile("build.temp.js", code);

}

main()
编译结果:
  import { ref } from "vue";

  const __sfc_main__ = {
    name: "Main",
    setup() {
      const message = ref("Main");
      return {
        message,
      };
    },
  };

__sfc_main__.__scopeId='data-v-1698413949392'
import { toDisplayString as _toDisplayString, openBlock as _openBlock, createElementBlock as _createElementBlock } from "vue"

const _hoisted_1 = { class: "message" }

export function render(_ctx, _cache) {
  return (_openBlock(), _createElementBlock("div", _hoisted_1, _toDisplayString(_ctx.message), 1 /* TEXT */))
}
__sfc_main__.render=render
export default __sfc_main__
虽然代码有点丑,但还是能看出来,它的是个 Vue 组件
但是这个还是不能使用的 因为浏览器无法导入裸模块,即 import "vue",浏览器是无法识别的,不知道从哪里获取 Vue 模块。下一步使用esbuild打包一下
打包代码
使用esbuild
const { build } = require("esbuild");
const { externalGlobalPlugin } = require("esbuild-plugin-external-global");

async function MainBuild() {
    await build({
        entryPoints: ["/Users/xiaohao/code/for-chrom-blog/ compile/build.temp.js"],	// 入口文件
        format: "esm",			// 打包成 esm
        outfile: "bundle.js",		// 设置打包文件的名字
        bundle: true,				// bundle 为 true 才是打包模式
        external: ["vue"],
        plugins: [
            externalGlobalPlugin({
                vue: "window.Vue",	// 将 import vue 模块,替换成 window.Vue,因为vue在html通过script导入了挂载到window上
            }),
        ],
    });
}

MainBuild()
- 将
vue模块external,即不参与打包(因为我们在index.html已经全局引入了 Vue,如果不全局引入 Vue,则需要将vue也打包到代码中) - 使用
externalGlobalPlugin插件,让external的Vue模块从window.Vue中获取。
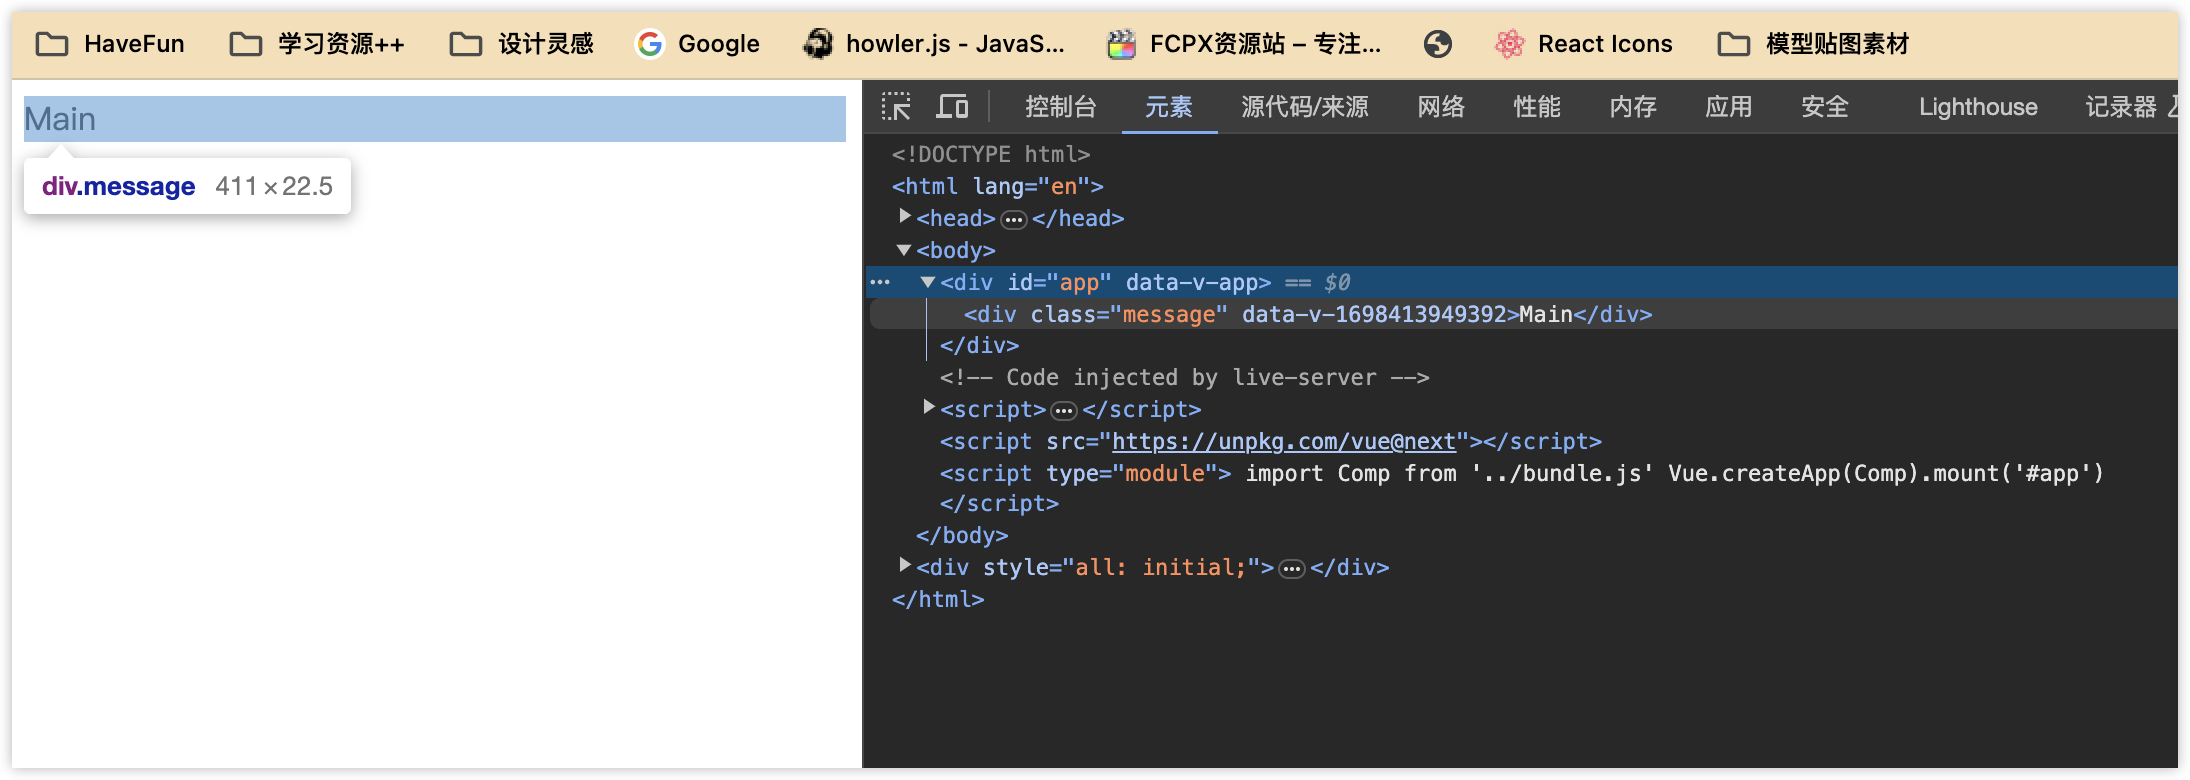
打包完成的代码,就可以直接给浏览器使用了
<!DOCTYPE html>
<html lang="en">
<head>
    <meta charset="UTF-8">
    <meta name="viewport" content="width=device-width, initial-scale=1.0">
    <title>Document</title>
</head>
<body>
    <div id="app"></div>
</body>
<script  src="https://unpkg.com/vue@next"></script>
</script>
<script type="module">
     import Comp from '../bundle.js'
    Vue.createApp(Comp).mount('#app')
</script>
</html>
编译 style
编译 style,编译产物还是 style,不是 js,目的是编译 vue 的一些特殊的能力
例如 style scope、v-bind()、:deep() 等
const { ..., compileStyle } = require("@vue/compiler-sfc")
// 一个 Vue 文件,可能有多个 style 标签
for (const styleBlock of descriptor.styles) {
    const styleCode = compileStyle({
        source: styleBlock.content,
        id,		// style 的 scope id,
        filename: "main.vue",
        scoped: styleBlock.scoped,
    });
}
编译后的对象如下:
{
  code: '\n' +
    '.message[data-v-1698415264398] {\n' +
    '    font-size: 60px;\n' +
    '    font-weight: 900;\n' +
    '}\n' +
    '  ',
  map: undefined,
  errors: [],
  rawResult: LazyResult {
    stringified: true,
    processed: true,
    result: Result {
      processor: [Processor],
      messages: [],
      root: [Root],
      opts: [Object],
      css: '\n' +
        '.message[data-v-1698415264398] {\n' +
        '    font-size: 60px;\n' +
        '    font-weight: 900;\n' +
        '}\n' +
        '  ',
      map: undefined,
      lastPlugin: [Object]
    },
    helpers: {
      plugin: [Function: plugin],
      stringify: [Function],
      parse: [Function],
      fromJSON: [Function],
      list: [Object],
      comment: [Function (anonymous)],
      atRule: [Function (anonymous)],
      decl: [Function (anonymous)],
      rule: [Function (anonymous)],
      root: [Function (anonymous)],
      document: [Function (anonymous)],
      CssSyntaxError: [Function],
      Declaration: [Function],
      Container: [Function],
      Processor: [Function],
      Document: [Function],
      Comment: [Function],
      Warning: [Function],
      AtRule: [Function],
      Result: [Function],
      Input: [Function],
      Rule: [Function],
      Root: [Function],
      Node: [Function],
      default: [Function],
      postcss: [Function],
      result: [Result]
    },
    plugins: [ [Object], [Object], [Object] ],
    listeners: {
      Declaration: [Array],
      Rule: [Array],
      AtRule: [Array],
      OnceExit: [Array]
    },
    hasListener: true
  },
  dependencies: Set(0) {}
}
code 就是 编译后的 style 代码:这里加上了传入的 scopeId
为什么编译产物不是 js?
因为
style使用的不一定是css,还可能是less、sass等语法,还需要交给其他预处理器以及后处理器,进行处理
css 最后如何转成 js?
直接用
createElement创建style标签,然后拼接到页面body即可
const styleDOM = `
  var el = document.createElement('style')
  el.innerHTML =  \`${styleCode.code}\`
  document.body.append(el);
`;
css 其实都是全局的,在这段样式代码被加载时,style 标签就已经被创建,然后插入到页面了。因此 css 需要使用 scope 的方式用做样式的隔离,需要提供 scopeId 给 compileStyle 函数,用来生成 [data-v-1656417674368] 这种选择器,以免影响到全局样式。
这个是最终经过各种compile编译过的组件代码
    var el = document.createElement('style')
    el.innerHTML =  `
.message[data-v-1698415413310] {
    font-size: 60px;
    font-weight: 900;
}
  `
    document.body.append(el);


  import { ref } from "vue";

  const __sfc_main__ = {
    name: "Main",
    setup() {
      const message = ref("Main");
      return {
        message,
      };
    },
  };

__sfc_main__.__scopeId='data-v-1698415413310'
import { toDisplayString as _toDisplayString, openBlock as _openBlock, createElementBlock as _createElementBlock } from "vue"

const _hoisted_1 = { class: "message" }

export function render(_ctx, _cache) {
  return (_openBlock(), _createElementBlock("div", _hoisted_1, _toDisplayString(_ctx.message), 1 /* TEXT */))
}
__sfc_main__.render=render
export default __sfc_main__
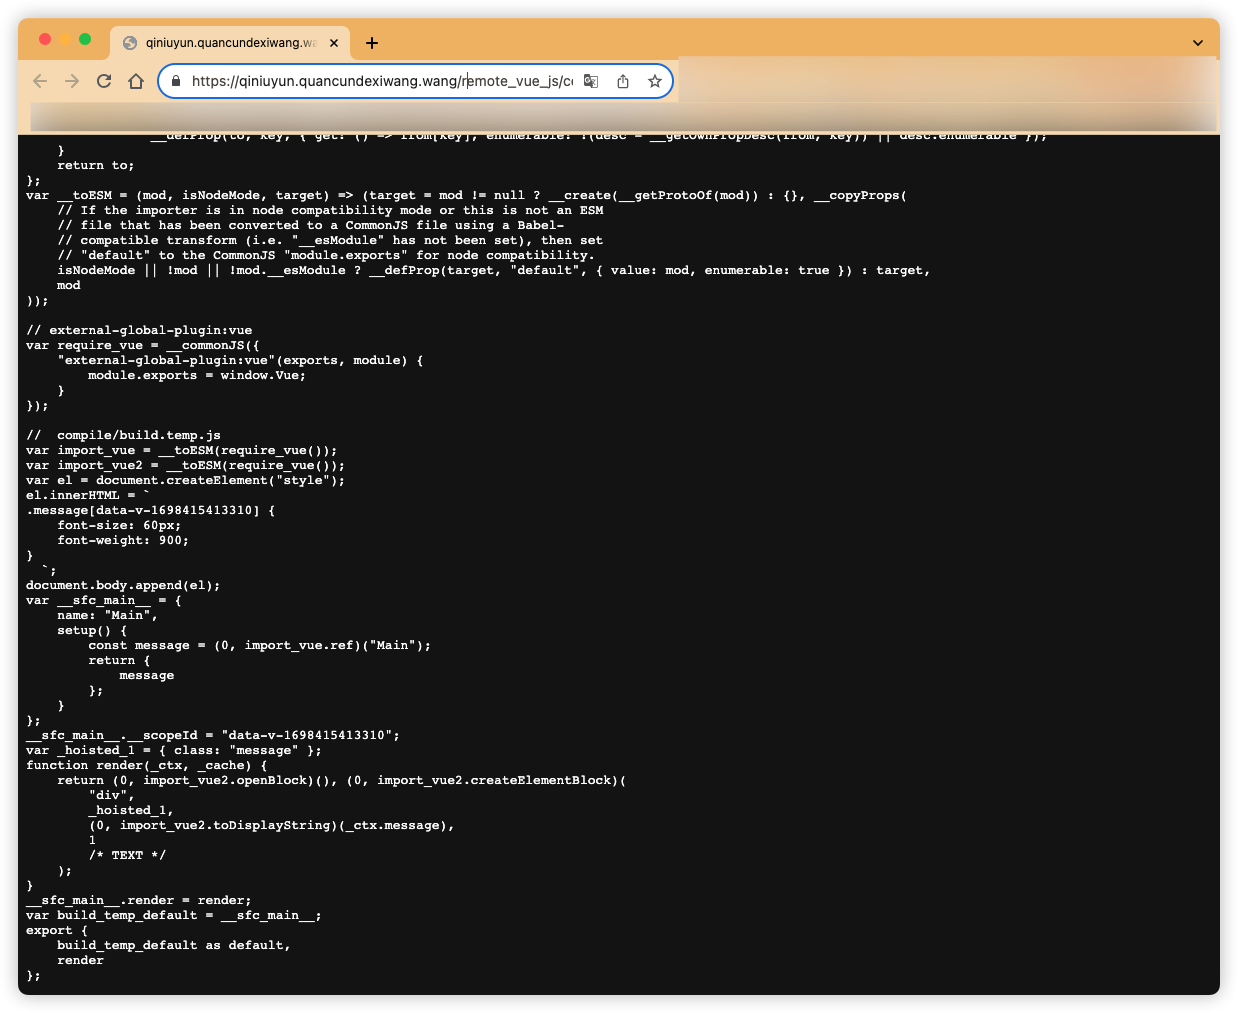
下面是经过esbuild打包后的最终代码
var __create = Object.create;
var __defProp = Object.defineProperty;
var __getOwnPropDesc = Object.getOwnPropertyDescriptor;
var __getOwnPropNames = Object.getOwnPropertyNames;
var __getProtoOf = Object.getPrototypeOf;
var __hasOwnProp = Object.prototype.hasOwnProperty;
var __commonJS = (cb, mod) => function __require() {
return mod || (0, cb[__getOwnPropNames(cb)[0]])((mod = { exports: {} }).exports, mod), mod.exports;
};
var __copyProps = (to, from, except, desc) => {
if (from && typeof from === "object" || typeof from === "function") {
for (let key of __getOwnPropNames(from))
if (!__hasOwnProp.call(to, key) && key !== except)
__defProp(to, key, { get: () => from[key], enumerable: !(desc = __getOwnPropDesc(from, key)) || desc.enumerable });
}
return to;
};
var __toESM = (mod, isNodeMode, target) => (target = mod != null ? __create(__getProtoOf(mod)) : {}, __copyProps(
// If the importer is in node compatibility mode or this is not an ESM
// file that has been converted to a CommonJS file using a Babel-
// compatible transform (i.e. "__esModule" has not been set), then set
// "default" to the CommonJS "module.exports" for node compatibility.
isNodeMode || !mod || !mod.__esModule ? __defProp(target, "default", { value: mod, enumerable: true }) : target,
mod
));
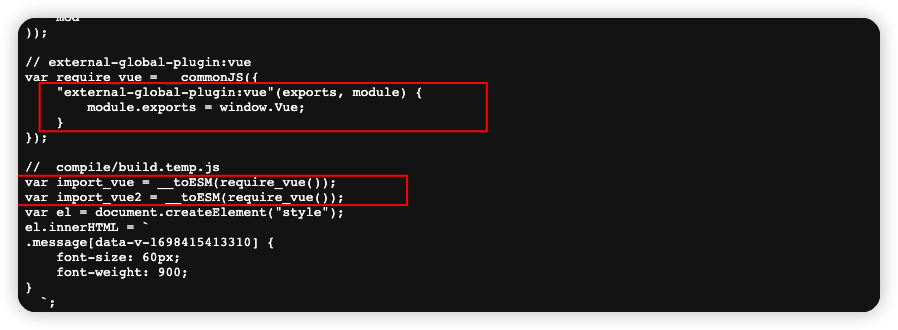
// external-global-plugin:vue
var require_vue = __commonJS({
"external-global-plugin:vue"(exports, module) {
module.exports = window.Vue;
}
});
// compile/build.temp.js
var import_vue = __toESM(require_vue());
var import_vue2 = __toESM(require_vue());
var el = document.createElement("style");
el.innerHTML = `
.message[data-v-1698415413310] {
font-size: 60px;
font-weight: 900;
}
`;
document.body.append(el);
var __sfc_main__ = {
name: "Main",
setup() {
const message = (0, import_vue.ref)("Main");
return {
message
};
}
};
__sfc_main__.__scopeId = "data-v-1698415413310";
var _hoisted_1 = { class: "message" };
function render(_ctx, _cache) {
return (0, import_vue2.openBlock)(), (0, import_vue2.createElementBlock)(
"div",
_hoisted_1,
(0, import_vue2.toDisplayString)(_ctx.message),
1
/* TEXT */
);
}
__sfc_main__.render = render;
var build_temp_default = __sfc_main__;
export {
build_temp_default as default,
render
};

可以看到样式隔离+样式效果都已经完成!
一个非常简单的 Vue 文件,使用 @vue/compiler-sfc,一步一步地将 Vue 文件进行编译处理,分别编译 script、template、style,并将这三部分组装到一起,最后将其进行打包,打包后的文件就能够在浏览器中正确运行,并渲染出界面。
其实@vite/plugin-vue 的处理过程,与我们手动处理的过程,大致相同,不过还加上了热更新、编译缓存、拆分成虚拟模块等能力。
组件上传到远程服务器,让vue-router加载远程组件
上面编译后到组件js代码,我上传到了OSS 组件代码地址
然后我们直接在vue-router中加载远程组件!
import { createApp } from 'vue'
import * as vue from "vue"
import * as VueRouter from 'vue-router'
import './style.css'
window.Vue = vue
import App from './App.vue'
import HelloWorldVue from './components/HelloWorld.vue'
import {loadPage} from "./utils/loadPage"
const routes = [
    { path: '/', component: HelloWorldVue },
    { path: '/about', component: HelloWorldVue },
    { path: '/remote',component: import("https://qiniuyun.quancundexiwang.wang/remote_vue_js/components.js")}
]
const router = VueRouter.createRouter({
    history: VueRouter.createWebHashHistory(),
    routes, // `routes: routes` 的缩写
})
const app = createApp(App)
app.use(router)
app.mount('#app')
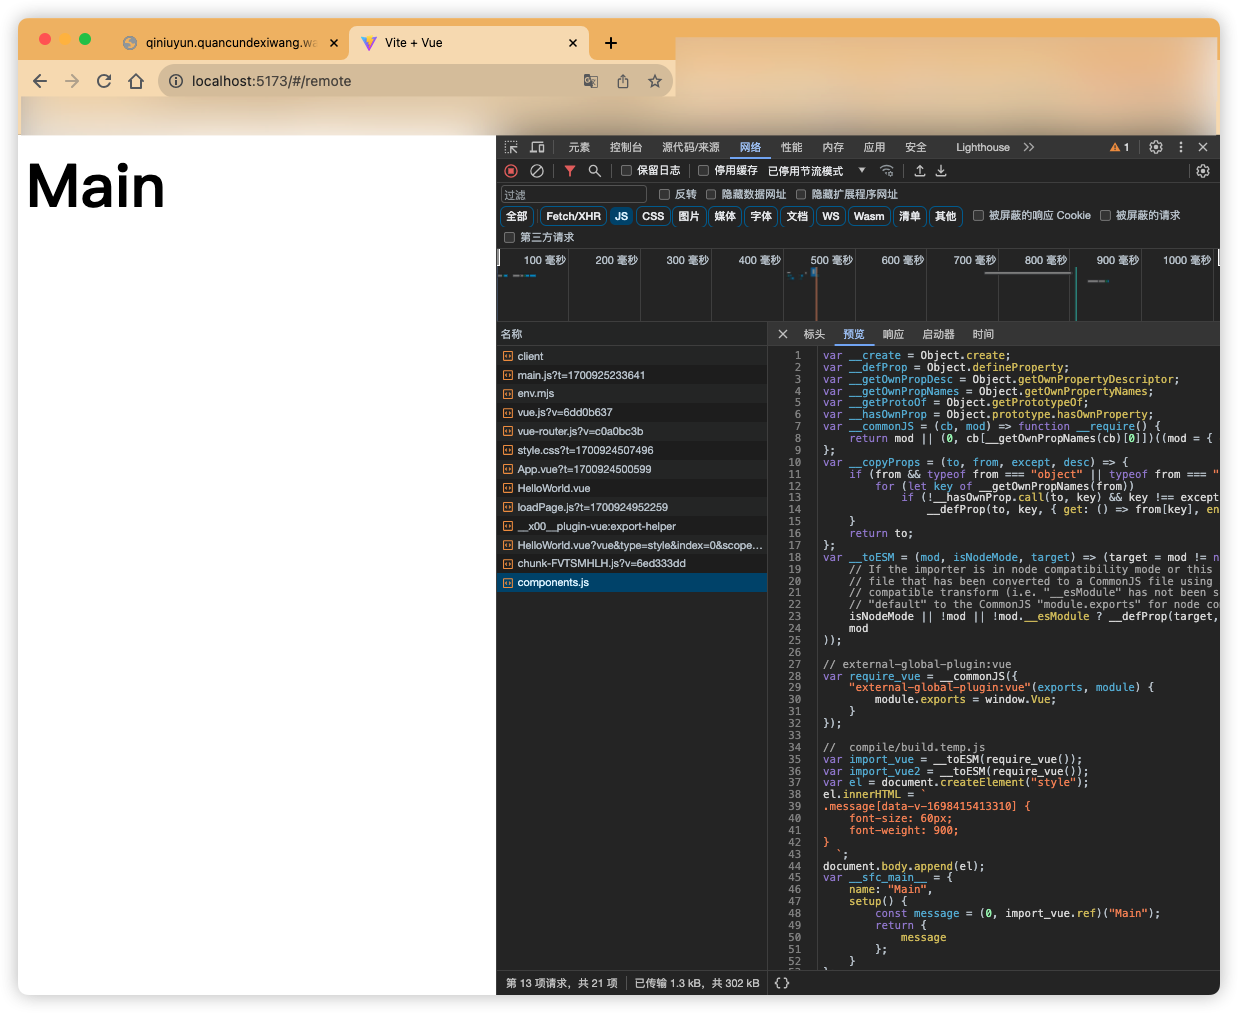
不出意外,完全OK
这里要注意,需要在vue项目中把 vue的全部导出挂载到window对象中!
import * as vue from "vue"
window.Vue = vue
因为我们rollup配置的原因,我们需要让这个组件使用目标环境的Vue上下文,保持Vue上下文的一致性
通过观察编译后到组件代码你也能发现:他是从window上获取到vue实例!!
运行时加载远程组件的方案!
感觉最难的其实是设计组件🤣!高度定制的需求还是不太合适!

评论区